229

This question and its answers list the names of bike parts and cycling concepts.

Some Rules

  • Make sure you only put one term per answer!
  • Try to include an image if applicable
  • Include sources that contain detailed information
  • Add a link to the index in this question using edit.

Also, I made this a community wiki, so that anyone will be able to edit it, and to stop rep-hoarding


There's a handy reference at the Park Tool Co. website, a bike repair map; it's a diagram of a bike with all the parts labeled, and is very handy! At the moment, the diagram is up at parktool.com/blog/repair-help. (They've changed the URL in the past, so this link may break.)

A road bike has the following parts (source):

enter image description here

A mountain bike has the following parts (source): enter image description here


Edit: This page is meant to identify what things or concepts are (as per this thread in meta). If you want to recommend an accessory or a specific product you've found handy, please use the accessories page.


Contents
A
Actuation Ratio
Axle
Axle Nuts
B
BCD (Bolt Circle Diameter)
Bearing
Belt Drive
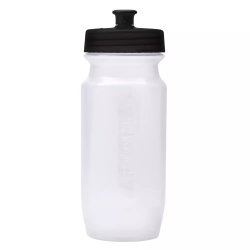
Bidon/Bottle
Bonk/Bonking
Bottle Cage / Bottle Holder
Bottom Bracket
Boom/Boom Tube
Brazed Frame
Brifter
BSD (Bead Seat Diameter)
BSO/Bike-Shaped-Object
C
Cable Pull
Cable Stretcher
Cadence
Cassette
Chain
Chainline
Chain Gauge
Chain Guard/Cover
Chain Tool
Chain Tug/Chain Tensioner
Chainstay Length
Chainsuck
Chamois
Clipless Pedals
Coaster Brake (foot brake / pedal brake)
Crank
D
Derailleur
Derailer Hanger/Derailleur Ranger
DetanglerBMX
Direct Drive
Disk/Disc Brake
Disc Hub
Door Zone
Dropout
Dropper Post
Dunlop Valve
Dutch Bike
E
Engine/Motor
Electronic shifting
Eccentric
F
Fender/Mudguard/Mudflaps
Fixed-Gear
Flip-Flop Hub
Folding Bike
Fork
Foot Peg
Frame
Frame Sizing
G
Gear Inches
Groupset
H
Handlebars
Headset
Hose Clamp aka Jubilee Clip
Hub
Hub Skewer
I
Internally-Geared Hub
J
K
Keel Tube
L
Lawyer lips/lawyer tabs
Lateral Tube
LBS/Local Bike Shop
Lights
Luggage Carrier/Rack
Lugged Frame
M
Master Link
MIPS
Mixte
Mountain Bike
N
Noodle
O
Over Locknut Dimension or OLD
P
Pannier
P-clip or R-clip
Play
Potts Mod BMX Brakes
Power Meter
Presta Valve/Presta Tube
Pump Peg
Q
Q-Factor
Quick-Release
R
Recumbent Cycles
REI (Recreational Equipment Inc)
Rim
Rim Tape
Rim Brakes, e.g. cantilever, dual pivot, V-brakes
Rotor
S
Saddle
Saddlebag
Schrader Valve/ Schrader Tube
Shaft Drive
Single-speed
Skewer
Spider
Spoke
Stack and Reach
Stay, Mudguard/fender
Stem
Suspension Fork/Rear Shock
T
Through/Thru Axle
Tire, Clincher
Tire, Tubeless
Tire, Tubular
Tire, Solid/airless/runflat
Tire Boot
Tire Clearance
Tire Lever/Tire Iron
Tire Saver
Tire Sealant
Tolerances
Track Pump/Floor Pump
Triathalon Bars/Triathlon Bars
U
U-Brake
V
V-Brake
Velomobile
W
Welded Frame
X
Y
Z
10
  • 8
    One term per answer please - would be beneficial.
    – dotjoe
    Commented Aug 26, 2010 at 13:51
  • 1
    Is there a way to link to a specific answer, so that in future questions you can use one of these terms and link to it for reference?
    – Kevin
    Commented Aug 26, 2010 at 16:13
  • 2
    Kevin: Under the bulk of the answer, there is a 'Link' hyperlink, which will link to the answer (its right above comment) Commented Aug 26, 2010 at 17:12
  • 8
    @MarkIngram: useful things that aren't actually questions are what community wikis are for.
    – freiheit
    Commented Sep 12, 2010 at 17:47
  • 2
    This page could use some more love. Maybe if people keep linking to individual terms here, more people will know about this page. Commented Jun 27, 2011 at 2:39

101 Answers 101

5

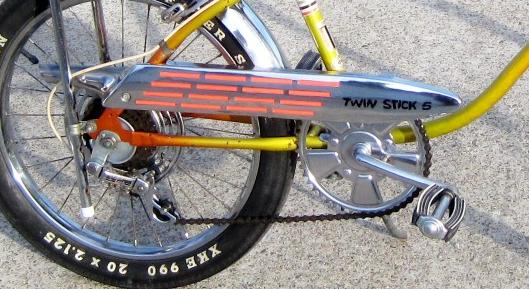
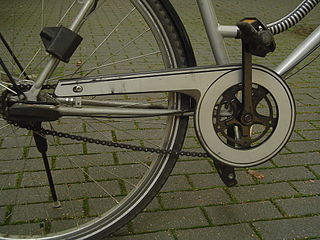
Chain guard/Chain cover

It's a frame, usually made of plastic or metal, that covers the entire length of the chain or only the upper part, mainly for protecting the rider from the dirt and lubricant on the chain, but can also protect the chain itself.

http://commons.wikimedia.org/wiki/File:Bike_chain_guard_full.JPG

http://upload.wikimedia.org/wikipedia/commons/thumb/6/69/Bike_chain_guard_part.JPG/320px-Bike_chain_guard_part.JPG

5

Chainsuck

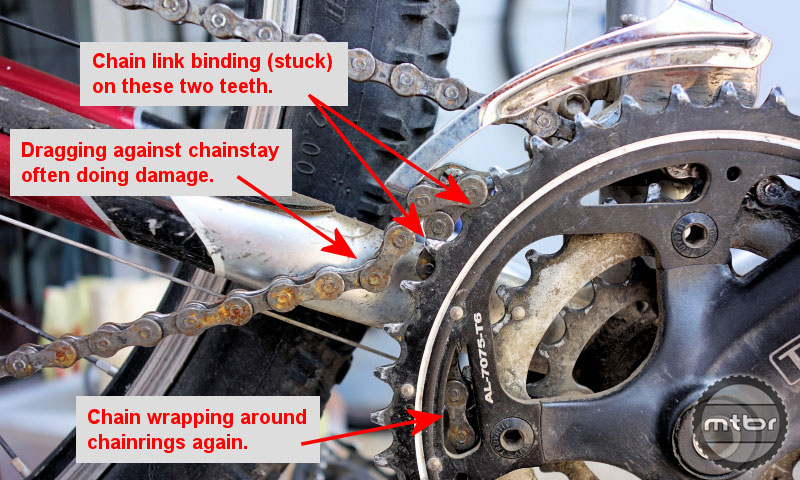
Chainsuck happens when the bicycle chain fails to disengage from the teeth of a chainring—usually during a shift—and wraps back up and around the chainring.

enter image description here

Citation and image from: http://reviews.mtbr.com/workbench-how-to-un-suck-your-chainsuck
See also: What causes chain suck?

5

BCD (Bolt Circle Diameter)

As Wolf Tooth Components describes,

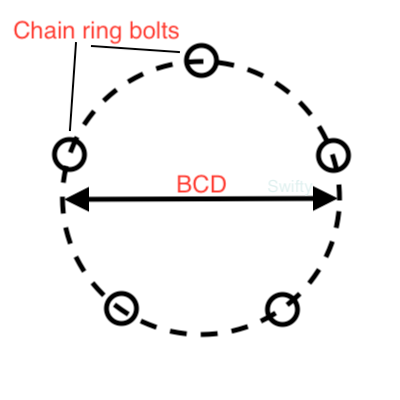
"Bolt Circle Diameter or BCD is the diameter of the circle that goes through the center of all of the bolts on your chainring. On bicycle chainring this dimension is usually measured in millimeters. It is critical to know the BCD of your crankset when you are selecting a new chainring for your bike."

BCD illustration

If the BCD is not written on the chainring, it must be found another way. One method is to compare the chainring directly with another one of known BCD, or against a scaled reference drawing. Each BCD has a minimum chainring size, e.g. for a 110mm BCDs 33 teeth are the smallest chainring size possible on most cranks without interference with other parts of the crank.

Alternatively, the distance between the centres of adjacent holes/bolts is measured and this value read into a look-up table (links to two examples from Wolf Tooth and Sheldon Brown) to find out the BCD. This can be done for 3, 4 and 5 bolt designs, meaning the BCD can be measured without removing the chain ring.

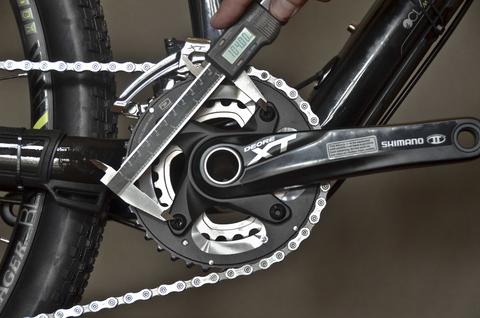
For a symmetrical, four bolt arrangement, measuring BCD is trivial with the use of a caliper, as seen below. The BCD of a chainring can similarly be measured directly with a ruler when the chainring is removed and the crank is not an obstruction. For many drop bar bikes bikes, 5-bolt arms with 130mm and 110mm BCDs were common, with many manufacturers having gone to proprietary and often asymmetrical 4-arm designs or direct mount cranks. MTB BCDs are smaller and more varied, and direct mount cranks have become more common here as well.

Measuring BCD on a symmetrical four bolt design

More recent 4-bolt road cranks are an exception. Many of them have 110mm BCDs, but they space the crankarms unevenly. If you are looking for a third-party chainring for these cranks, the manufacturer will state which brand the rings are compatible with (and sometimes, which models, e.g. Shimano R9100 and R8000 vs 9000 and 6800). Alternatively, some cranks are direct mount, i.e. the chainring is made with the spider and bolts to a splined interface shared with the crankarm. These chainrings will state which interfaces they are compatible with, e.g. Praxis or SRAM/Quarq.

1
  • Typical/common sizes would also be helpful.
    – TLW
    Commented May 6, 2021 at 1:26
5

Lugged Frame

also lugs

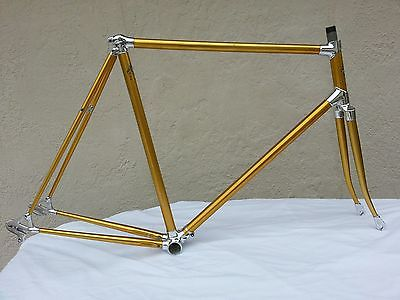
A method of frame-building where at least the major joints consist of frame tubes inserted into castings (the lugs). Lugs are often associated with steel frames. Steel lugs are hand-made by bending and filing rather than casting. Lugged frames are normally brazed, but can also be soldered (with lead or silver rather than brass) and occasionally glued (the Windcheetah trike used glued aluminium, for example).

Historically, lugged frames were very common, and many classic steel frames were built this way. Lugged construction in mass-produced bikes of any material is rare, and most modern steel frames are welded. Another alternative construction method for steel frames is fillet brazing.

classic Italian lugged frame

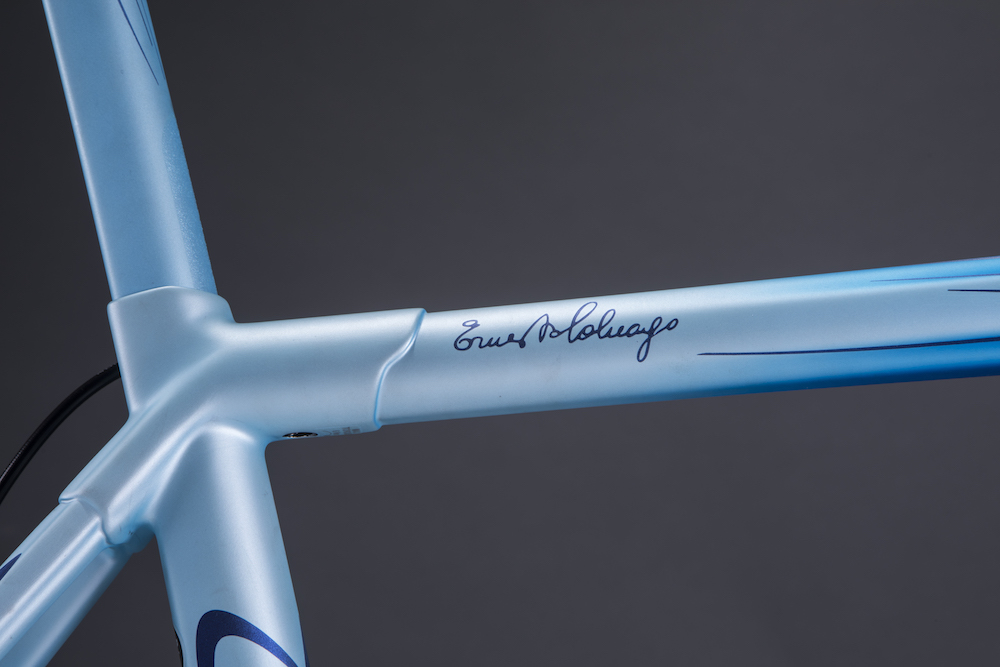
A minority of carbon frames are lugged, for example the Colnago C-64 (link from Cyclingweekly).

enter image description here

It is also possible to bond carbon tubes to metal lugs. For example, the Trek 2300 frame used carbon tubes bonded to aluminum lugs.

5

Tyre Clearance or Tire Clearance

Wider tires at a lower pressure are more comfortable than narrower ones, and they often have no rolling resistance penalty. For riders interested in fitting wider tires, many bikes will state the maximum tire size the frame and fork have room to fit. For example, 2020-2021 gravel bikes can typically fit at least 40mm tires, and many 2020-2021 road bikes can fit as much as a 32mm tire. There is often some wiggle room, because tires' actual width can vary slightly from their nominal size (i.e. the size printed on the sidewall). This can be due to manufacturing variations, but tires will get larger as the rim's internal width grows, and bike manufacturers do not know what rim size their bikes will be used with.

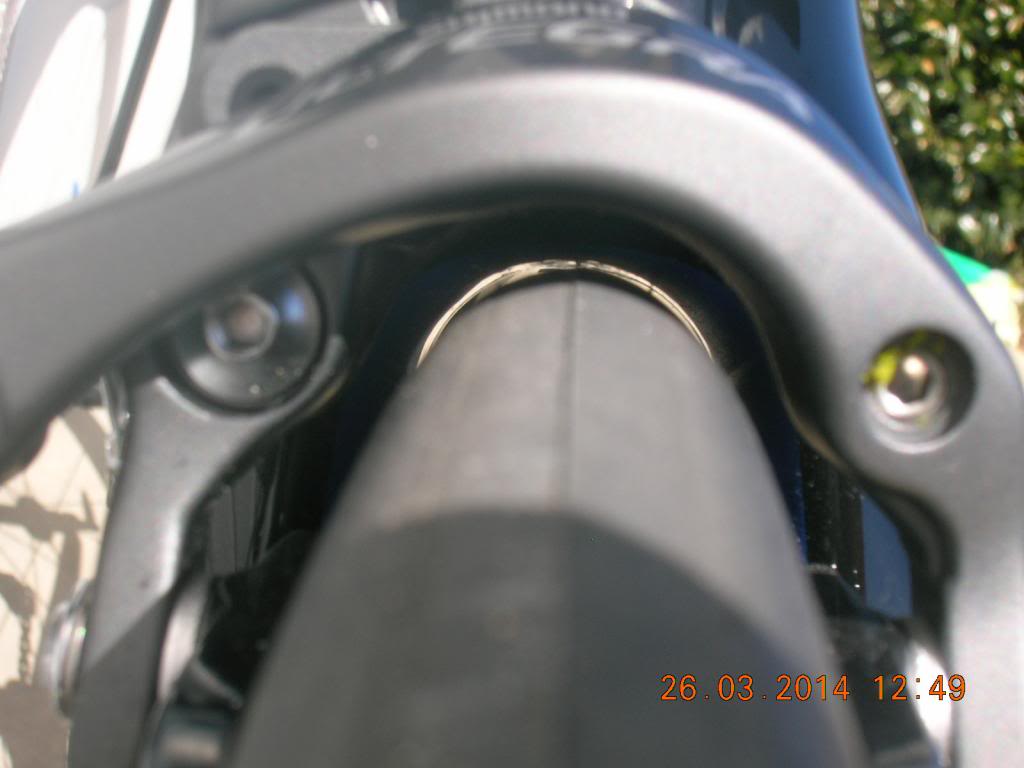
On road bikes, manufacturers typically aim for at least 4mm clearance on all sides of the tire, measured at the narrowest part of the fork or the rear of the bike. Off-road bikes should aim for more clearance than this to enable mud or dirt build up. The photograph below illustrates insufficient tire clearance between the arch of the brake caliper and the fork crown, i.e. there isn't enough vertical clearance under the brake arch. You also need to check horizontal clearance at the fork legs, seat stays, and chain stays.

enter image description here

If you have too little clearance, then if dirt or mud accumulates, it will abrade through your paint and possibly through the frame itself. A deeper, illustrated discussion is here. Note that if you don't have measuring calipers, you can use allen wrenches to check your current tire clearance, i.e. try to fit a 4mm allen wrench between your tire and frame.

Some aerodynamic road or time trial bikes are designed for minimal clearance between the back tire and the frame. They may have cutouts in the seat tube, or a curved seat tube. A similar arrangement is also possible in front.

3
  • 1
    I am surprised that a smaller gap should be aerodynamically better, which is also not explained in the linked article. Could someone explain (here or there), there must surely be a lower limit?
    – PJTraill
    Commented Jul 15, 2018 at 22:03
  • @PJTraill This might be better in Bicycles Chat, but in brief, the tyre creates a substantial circular airflow while spinning. Test by spinning up the back wheel of your bike while its off the ground, then put a hand near the fast moving tyre. Its much worse on a MTB knobbly, but even a smooth road tyre as pictured will create a draught. The tight clearance helps reduce the two airflows meeting head on - if anything the rear airflow should help push the bike and the airflow from the front should be smoothly diverted to the sides, rather than meeting and being choppy air. Like a splitter on a car.
    – Criggie
    Commented Jul 16, 2018 at 9:02
  • @PJTraill the lower limit would be touching - if your tyre rubs your bike then that's wasted watts, and it will wear out the tyre and the rubbed point, which is also bad for your bike. Since all bikes have some amount of flex, the wheel will have some slight movement requiring space to prevent rubbing. That's the lower limit. Anyway - do consider joining the Bicycles Chat.
    – Criggie
    Commented Jul 16, 2018 at 9:05
4

Stack Height

The stack height of a headset is the vertical space taken up by a headset, and the stem when using a threadless headset. It's the difference between the headtube length and the fork steerer length needed to be able to use that headset with that fork and headtube.

http://www.parktool.com/blog/repair-help/fork-column-length-and-sizing

http://sheldonbrown.com/gloss_st-z.html

4

Coaster Brake

(a.k.a foot brake, or pedal brake.)

A coaster brake is a special rear hub for a bicycle, which performs two functions:

  • It allows the bicycle to roll without forcing the pedals to turn. This is the "coaster" part. It is similar in function to a freewheel , but uses a different sort of mechanism to accomplish it.

  • It is also a brake, operated by turning the pedals backwards.

Coaster brakes were invented in the 1890s, and have continued to be popular in some areas to this day.

Source: https://sheldonbrown.com/coaster-brakes.html


coaster brake hub

A video explaining the internal mechanism of a coaster brake:

See questions about coaster brakes

4

Single-speed

This means a bike that has exactly one rear cog, and cannot change gear. Very similar to a fixed-gear bike except a single-speed has a freewheel mechanism to allow coasting, i.e. riding along without pedalling.

Compare with Fixed-Gear.

4

Rim Tape

For clincher type rims and tires with inner tubes: tape applied to the inside of the wheel rim to protect the inner tube from sharp edges and the ends of the spokes and spoke nipples, which would otherwise abrade the tube and cause punctures.

For tubeless clincher rims and tires: tubeless rim tape covers the spoke holes and seals the inside of the rim. The tape aids in keeping the system airtight. Thus, rim tapes made specifically for tubed clinchers, like cloth tape, will not work as tubeless rim tape. However, tubeless rims with tubeless tape can still accept inner tubes. In fact, riders with tubeless tires will often carry a tube for emergencies.

Tubular rims do not use rim tape in the same manner as clincher rims. Tubular tires themselves are an airtight unit. However, some cyclists use tubular glue tape in place of liquid glue, or as a supplement to glue.

4

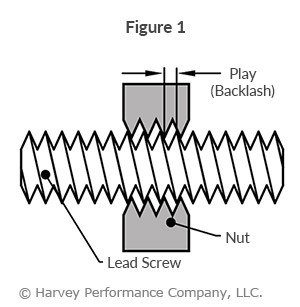
Play

Play means unwanted movement in a system. It can be caused when one or more moving mechanical parts do not fit as specified. This can be caused when manufactured parts are out of the specified tolerances, e.g. one part is too small.

In some cases, play can develop if parts were in tolerance to begin with but they wear excessively. For example, older rear derailleurs may wear to the point where the pivots are sloppy, which decreases shifting quality.

Alternatively, some systems need to be tightened down to avoid play. For example, headsets need to have their top caps tightened, or the steerer tube will rock fore to aft. Some cranksets and hubs will have lateral play if not tightened. This is called adjusting the preload of the system, and is discussed under bearings.

Opposites: Tight/stiff/fine +tolerances, precise.
Synonyms or similar concepts: Slop, wear, wobbly, loose, janky, worn, worn out.

enter image description here

4

Axle

Quote and image from Sheldon Brown's Bicycle Glossary:

The shaft at the middle of a bearing. There is some controversy as to whether "axle" or "spindle" should be used in particular contexts. The distinction is based on whether the axle/spindle is stationary, as that in a hub, or rotates, as that in a bottom bracket. There have been bitter flame wars fought in magazine letters columns over this point.

axle

The image above is a hub axle. This hub takes cup and cone bearings, and the balls are in contact with the cones. The locknuts adjust the preload, I.e. how ‘tight’ the hub is. Too much or too little preload will damage the bearings. Axles for cartridge bearing hubs omit the cones, and there are usually endcaps rather than adjustable locknuts. The other common axle on bikes is attached to the crank or bottom bracket, although this is often called a spindle by convention.

See questions about axle

4

Q-Factor

Related: Stance width

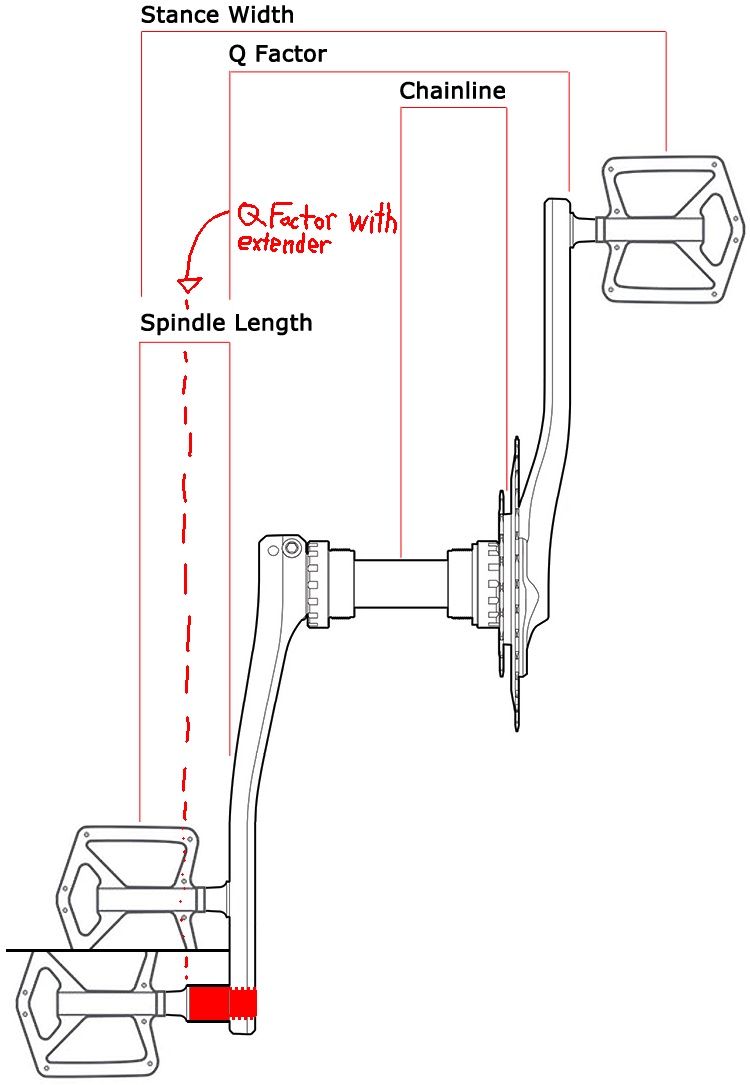
Q-factor is the distance (in millimetres) between the outside faces of your crank arms. It is one component of your stance width, which is the Q-factor plus the horizontal distance from the outside face of each crankarm to the center of the pedal. In common speech, people may conflate Q-factor with stance width.

The term may originate as a contraction of “quack factor”, originating with Grant Peterson, an engineer formerly at Bridgestone Cycles. A larger Q-factor, all else equal, means that your pedals are further away from the bike's center line, and therefore your feet are further apart. The diagram below illustrates Q-factor, and it also shows how Q-factor is distinct from chainline.

Edited version of previous pic from https://electricbikereview.com/forum/attachments/bicycle-q-factor-jpg.21791/

Ultimately, when you are pedaling, you want your feet to be moving straight up and down. A stance width that is too wide or too narrow can make your knees depart from this ideal path, e.g. they might wander outwards at the top of the pedal stroke. This can eventually cause knee problems.

Q-factor is an inherent property of your crankset and your bicycle. Road cranksets have Qs around 146mm, with gravel-specific groupsets having about 5mm wider Q than this. MTB cranksets have Qs of at least 160mm for non-Boost bikes, and wider for bikes that use Boost spacing. MTBs have wider Qs in large part to enable sufficient tire clearance. There are generally few options to adjust the Q-factor, and besides this cranks are expensive.

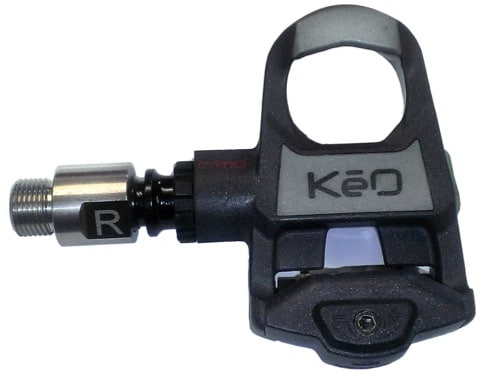
However, there are many options to adjust stance width. The picture below shows a pedal extender, which usually adds 20mm on each side to the stance width. It is usually safe to add 1-2mm washers to a standard pedal, although going further is not recommended as not enough threads on the pedal spindle will engage. Most pedal manufacturers use 52-53mm as their default pedal width, but many offer axles that are 4mm longer than standard. Last, you can move your cleats laterally on their mounting points, usually by about 2-3mm from the centerline. Aside from moving cleats, options to reduce stance width tend to be fewer, but fewer riders need these.

enter image description here

Note - Q-factor is NOT measured from the bike centerline because some frames are asymmetric.

11
  • 1
    I'm not sure I get this correctly: "Q-factor can be increased by adding extenders, or using wider pedals." -- But in the diagram I see that Q factor is not influenced by pedal width.
    – Robert
    Commented Sep 24, 2019 at 6:58
  • 1
    @RobertLee fair point - how's that edit? Basically the extender is a short bolt, with another thread in the end that effectively makes the pedal's shaft longer / have more stick-out. Downside, more leverage on the threads because its now a longer lever. I only drew one extender, normally they'd be fitted in pairs, but variation in people might make fitting a single appropriate, perhaps their hips are not symmetrical. A bike fit would show up differences like that.
    – Criggie
    Commented Sep 24, 2019 at 9:08
  • 1
    "Q-factor can only be reduced by changing the cranks for narrower ones, which increases the possibility of heel/shoe strike on the crankset or chain or front derailleur." Can't it also be reduced by a shorter BB spindle (square tapered type for example)?
    – Robert
    Commented Sep 25, 2019 at 17:14
  • 1
    @Criggie I feel this is missing one of the most vital pieces of information about Q-factor: The "Q" stands for "quack", a reference to the wide stance and waddling gait of ducks. Something I was told many years ago and assumed was probably true, now validated on Wikipedia with a proper source - en.wikipedia.org/wiki/Q_factor_(bicycles)#cite_note-3
    – DecSim
    Commented Oct 9, 2019 at 21:59
  • 1
    @RobertLee Per the discussion we had, I've just gone and added references to stance width in the article. In any case, it's my sense that in common speech, people tend to conflate Q-factor and stance width. Furthermore, it is actually quite hard to adjust Q-factor. You may be able to change your crankset, but options with different Qs tend to be scarce, unless you count moving from a road group to a gravel group, or edge cases like the eeWings All-Road crankset, which has a 160mm Q and costs over US$1k (!!!). Options to adjust your stance width are more plentiful.
    – Weiwen Ng
    Commented Nov 30, 2021 at 21:35
3

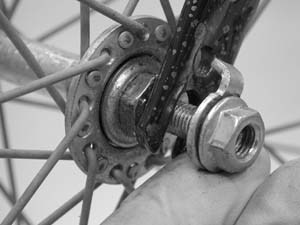
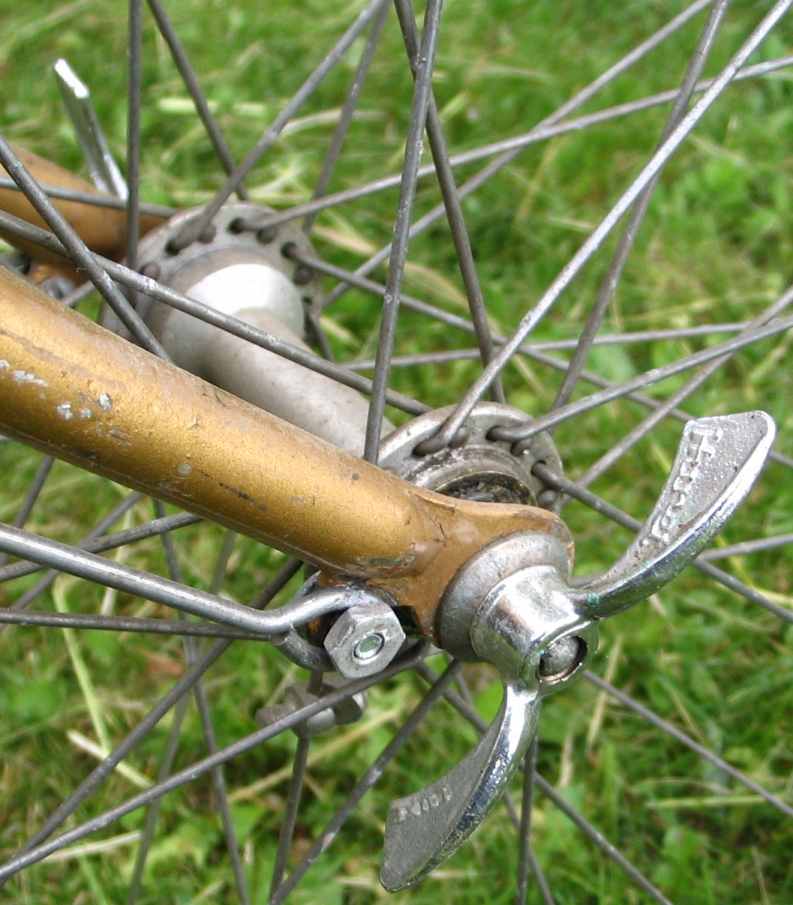
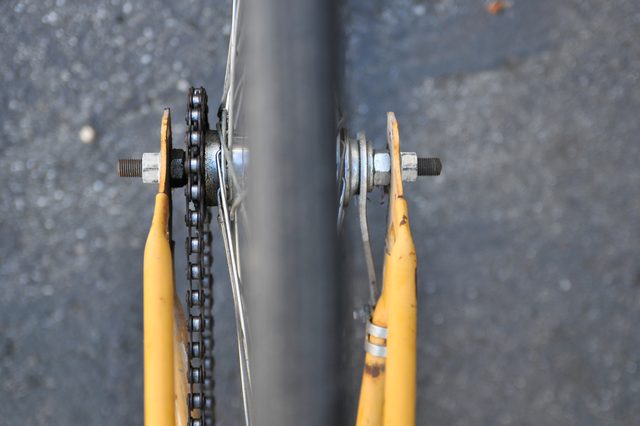
Axle Nuts

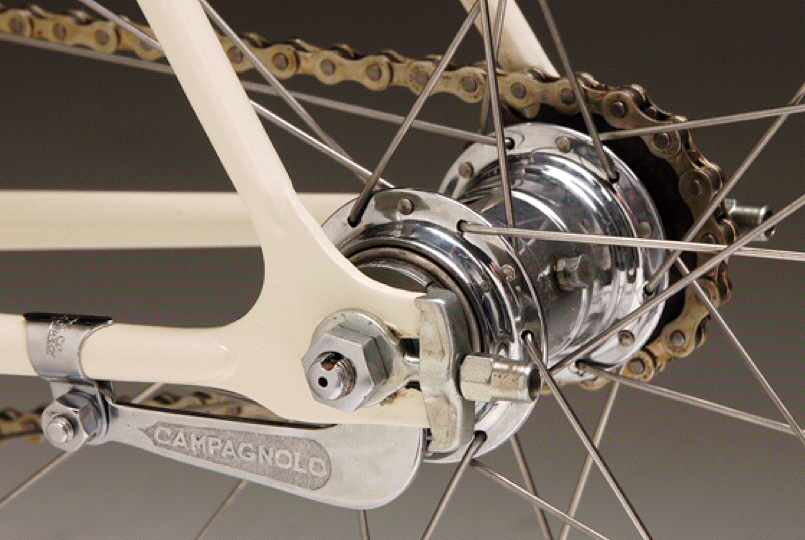
An older method of holding a wheel into dropouts.

Compare with Through Axles or with Quick Release/QR

enter image description here

This image also shows a retention washer with a hooked retainer.

enter image description here

Some particularly vintage wheel wingnuts. These could have been on a racer, or used so the rider didn't need a tool.

enter image description here

Vertical view showing the nuts on either side of the wheel, and how the axle and dropouts are organised.

1
  • 1
    It will take a thief slightly more time, and will need a wrench, to unscrew the nuts and steal your wheel; one small advantage over quick release types, perhaps.
    – Robert
    Commented Jun 15, 2019 at 22:29
3

Derailleur or derailer

Derailleurs enable bicycles to use multiple gears. The word's origin is French, but in English the accent mark is omitted. It is sometimes spelled derailer.

Before derailleurs, bicycles often had one gear mounted to either side of the rear hub, and riders would stop and then flip their rear wheel around to change gears. Derailleurs enabled riders to change gears while riding by "de railing" the chain from one cog to the next. By enabling multiple gears, they significantly increased the range of terrain that bicycles could cover.

Derailleurs were first invented in the late 19th century. Early versions used rods to push the chain onto different cogs. Tullio Campagnolo played a major role in the development of modern derailleurs, having commercialized a successful version in 1949.

Maintenance

Almost all derailleurs are actuated by shift cables. Because cables stretch a bit over time, new bikes require a minor adjustment after a few weeks' riding. While there is a bit of a learning curve, it is possible to adjust your derailers yourself, a process outlined later. The shift cables and housing are the main wear parts in derailer drivetrains, as they will accumulate contamination over time. Very active riders may replace these as often as annually. In many cases, poor shifting can be rectified by changing the cables.

The Delrin jockey wheels are the other common wear part on the rear derailer, but the replacement interval is much longer. If you can't find an OEM replacement, you should be able to find an aftermarket one.

The rear derailer is mounted to the frame with a derailer hangar, usually replaceable and made of aluminum. Even a minor drop can bend the hangar, which will affect shifting. However, the hangar is designed to break before anything more valuable, i.e. the derailer itself or the frame, does.

Key concepts and terms

  • For front derailleurs, capacity is the maximum chainring difference it can shift, e.g. the common compact double crankset with a 50t big ring and a 34t small ring needs a capacity of 50-34 = 16. Modern Shimano and Campagnolo road front derailleurs are rated for that capacity, with SRAM using a smaller capacity deliberately. For triple cranks, use the difference in tooth counts between the big and smallest ring.
  • For rear derailleurs, capacity is the difference above, plus the difference between the largest and smallest cog. For example, with the compact crankset above and a 11-34 cassette, the required rear derailleur capacity would be 16 + (34-11) = 16 + 23 = 39. This is the exact capacity of Shimano's R7000 and R8000 long cage rear derailleurs.
  • Rear derailleurs may be offered in several different cage lengths. Longer cages have higher capacity. In theory, they should shift a bit more slowly than short cage derailleurs, but the difference may be noticeable. There is often a maximum size for the largest cog, e.g. short cage Shimano R7000 and R8000 rear derailleurs are rated for cassettes with up to 30t big cogs, which means that 11-32 and 11-34 cassettes are out of manufacturer specification.
  • However, you can commonly exceed the stated capacity slightly. Shifting will be worse than if you run equipment in spec, and the quality of shifting should decline as you go further from spec. However, not all bikes will be affected the same way, and not all cyclists will notice.

Alternatives to derailleurs

Internally geared hubs (IGHs) are an alternative system. The rear hub contains all the gears and shifting mechanisms. These are much less vulnerable to contamination than traditional drivetrains, but they have slightly greater drivetrain friction. Some IGHs may use drive belts rather than chains. Note that drive belts are not compatible with traditional derailers. IGHs are sealed from the elements, although some main require periodic lubrication through a port. This answer discusses more. Gearboxes are similar to IGHs, but the gearing mechanism is mounted at the bottom bracket.

As another alternative, one can ride a single speed or fixed gear bicycle, both of which have only one or two gears (the second gear, if present, would be mounted on the opposite side of the rear hub).

Recent developments

The number of cogs on the rear wheel has increased with time, and the gear ranges available have become a lot wider. On road bikes, this has mostly led to the demise of the triple crankset.

Modern mountain bikes have switched to 1x (pronounced one-by) drivetrains, dropping the front derailer entirely. This has enabled wider tires and improvements in the rear suspension. 1x systems are becoming more common on gravel bikes, but they are not widespread on road bikes as of late 2021. On a 2x drivetrain, if you drop the chainring to the inside, you can often recover by shifting to the big ring and pedaling (and the reverse if you drop the chain to the outside). 1x drivetrains do not have this option. They use 1x-specific chainrings with narrow-wide teeth, i.e. the teeth alternate between narrow and wide teeth to retain the chain more firmly. They also incorporate clutches in the rear derailers, which reduce the amount of chain slap on rough terrain.

Electronically actuated drivetrains have become popular as a high-end option as well. These do away with metal shift cables entirely. They also have potential for adaptive cycling, as you can actuate shifts with a lot less finger force and you could set up the system for one-handed operation. However, they are considerably more expensive than mechanical shifting. In principle, derailleurs could also be hydraulically actuated, but no major drivetrain company has yet proposed a system.

You can adjust your derailers yourself!

NB - Before any rear derailleur adjustment, first ensure the derailleur hanger is aligned correctly

Adjustment may seem intimidating at first. However, it can be learned easily, and it will improve with practice.

Both front and rear derailleurs are adjustable by high (H) and low (L) limit screws. The limit screws control how far the rear derailleur can move in the largest (high limit) and smallest (low limit) cogs. At each limit, you should aim to center the derailleur on the smallest (low limit) and largest (high limit) cogs respectively. For the front derailleur, the high limit refers to the big chainring (i.e. higher gearing).

In addition, rear derailleurs have a cable tension adjuster. This accounts for the fact that cables stretch after some use. When facing the rear derailleur from the rear of the bike, if you turn the adjusting knob, this loosens the cable. It may help to remember that as your shifters pull cable, the derailleurs move towards the larger cognote or chainring. When the rear derailleur isn't moving far enough towards the next larger cog, it may fail to shift, so adding cable tension (i.e. turn knob anti-clockwise) will help it move further. (This is different from the limit screws, which control how far the derailleur can move, and for the rear that only applies to the smallest and largest cogs.)

Last, rear derailleurs also have a screw to control how close the top pulley is to the cogs (the B-tension screw). If the top pulley is too far away from the cogs, this should reduce shift quality. If it is too close, you may be unable to shift to the largest cog, as the chain will rub. Manufacturers typically specify an acceptable distance. Park Tools also has written guides (for the rear and front derailleurs respectively), and their YouTube channel also has videos with explanations.

The following shows how to adjust cable-operated front and rear derailleurs and is intended for general information.

Chain Gap Adjustment (B screw)

  1. Shift the rear derailleur to the largest cog.
  2. Ideally, using a chain gap gauge, adjust the B screw until the top derailleur jockey wheel aligns with the teeth of the largest cassette cog. If you do not have a chain gap alignment gauge handy, aim for the gap to be between 10-15mm* (*refer to your groupset provider)

Rear Derailleur Adjustment

  1. Shift to the smallest cog on the rear cassette (this is the natural resting position for the derailleur when no cable tension is applied)
  2. For cable operated derailleurs, remove all tension from the rear derailleur by loosening and/or removing the cable
  3. Use this opportunity to wind the barrel adjuster on the rear derailleur shifter all the way in, then back it out 1 - 2 turns.
  4. Adjust the high limit (H) screw so that the centre of the top pulley wheel aligns with the outboard edge of the smallest cassette cog
  5. For cable operated derailleurs, re-attach the rear derailleur cable, pulling taught, but not under extreme pressure, and tighten the cable bolt.
  6. Shift to the largest cog on the rear cassette
  7. Adjust the low limit (L) screw so that the centre of the top pulley wheel aligns with the outboard edge of the largest cassette cog
  8. Fine adjustment can now be made via the barrel adjust on the shifter

Front Derailleur Adjustment

  1. Adjust the derailleur at its mounting bolt so that there is a clearance of 1 - 3mm between the derailleur outer plate and the largest chainring
  2. Tighten the clamp bolt, but do not torque to spec
  3. Shift to smallest cog on the rear cassette the largest chainring
  4. Adjust the high (H) adjustment bolt and align the front end of the derailleur outer plate parallel to the surface of the largest chainring
  5. Adjust the derailleur by rotating the mount so that the rear portion of the outer plates is 0.5 - 1mm inside the outer chainring
  6. Tighten the derailleur clamp bolt and torque to spec
  7. Shift to the largest cog on the rear cassette and the smallest chainring
  8. Adjust the low (L) adjustment bolt so that the clearance between the skid plate of the derailleur and the chain is 0 - 0.5mm

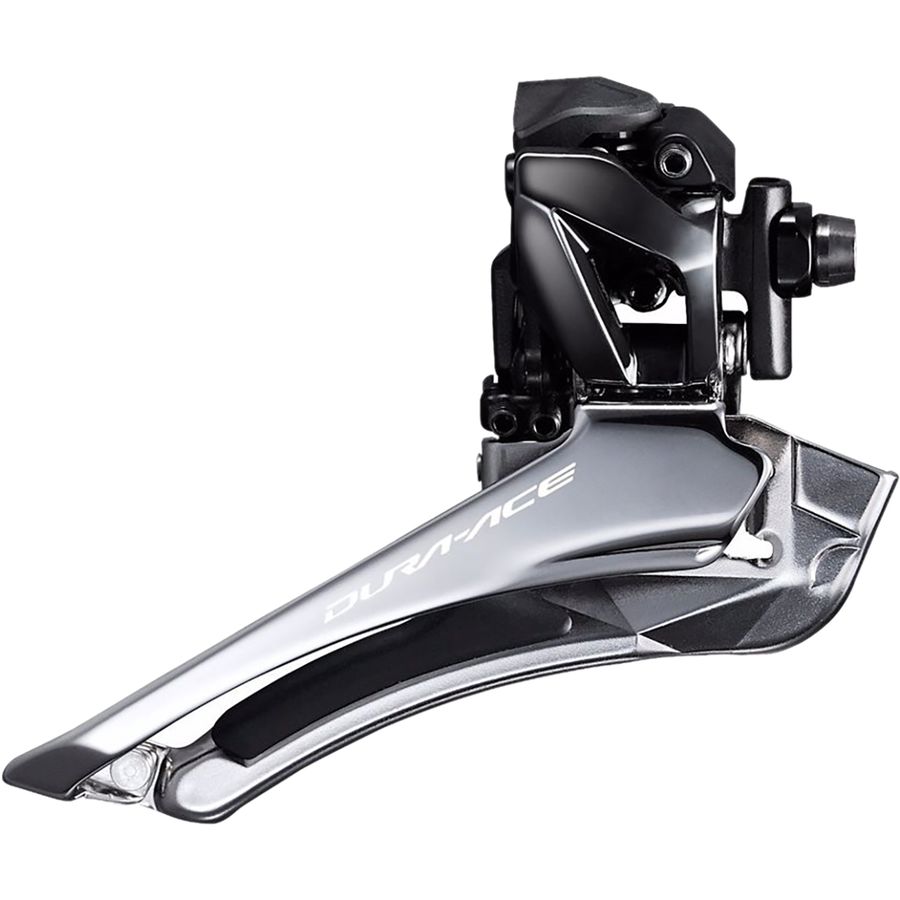
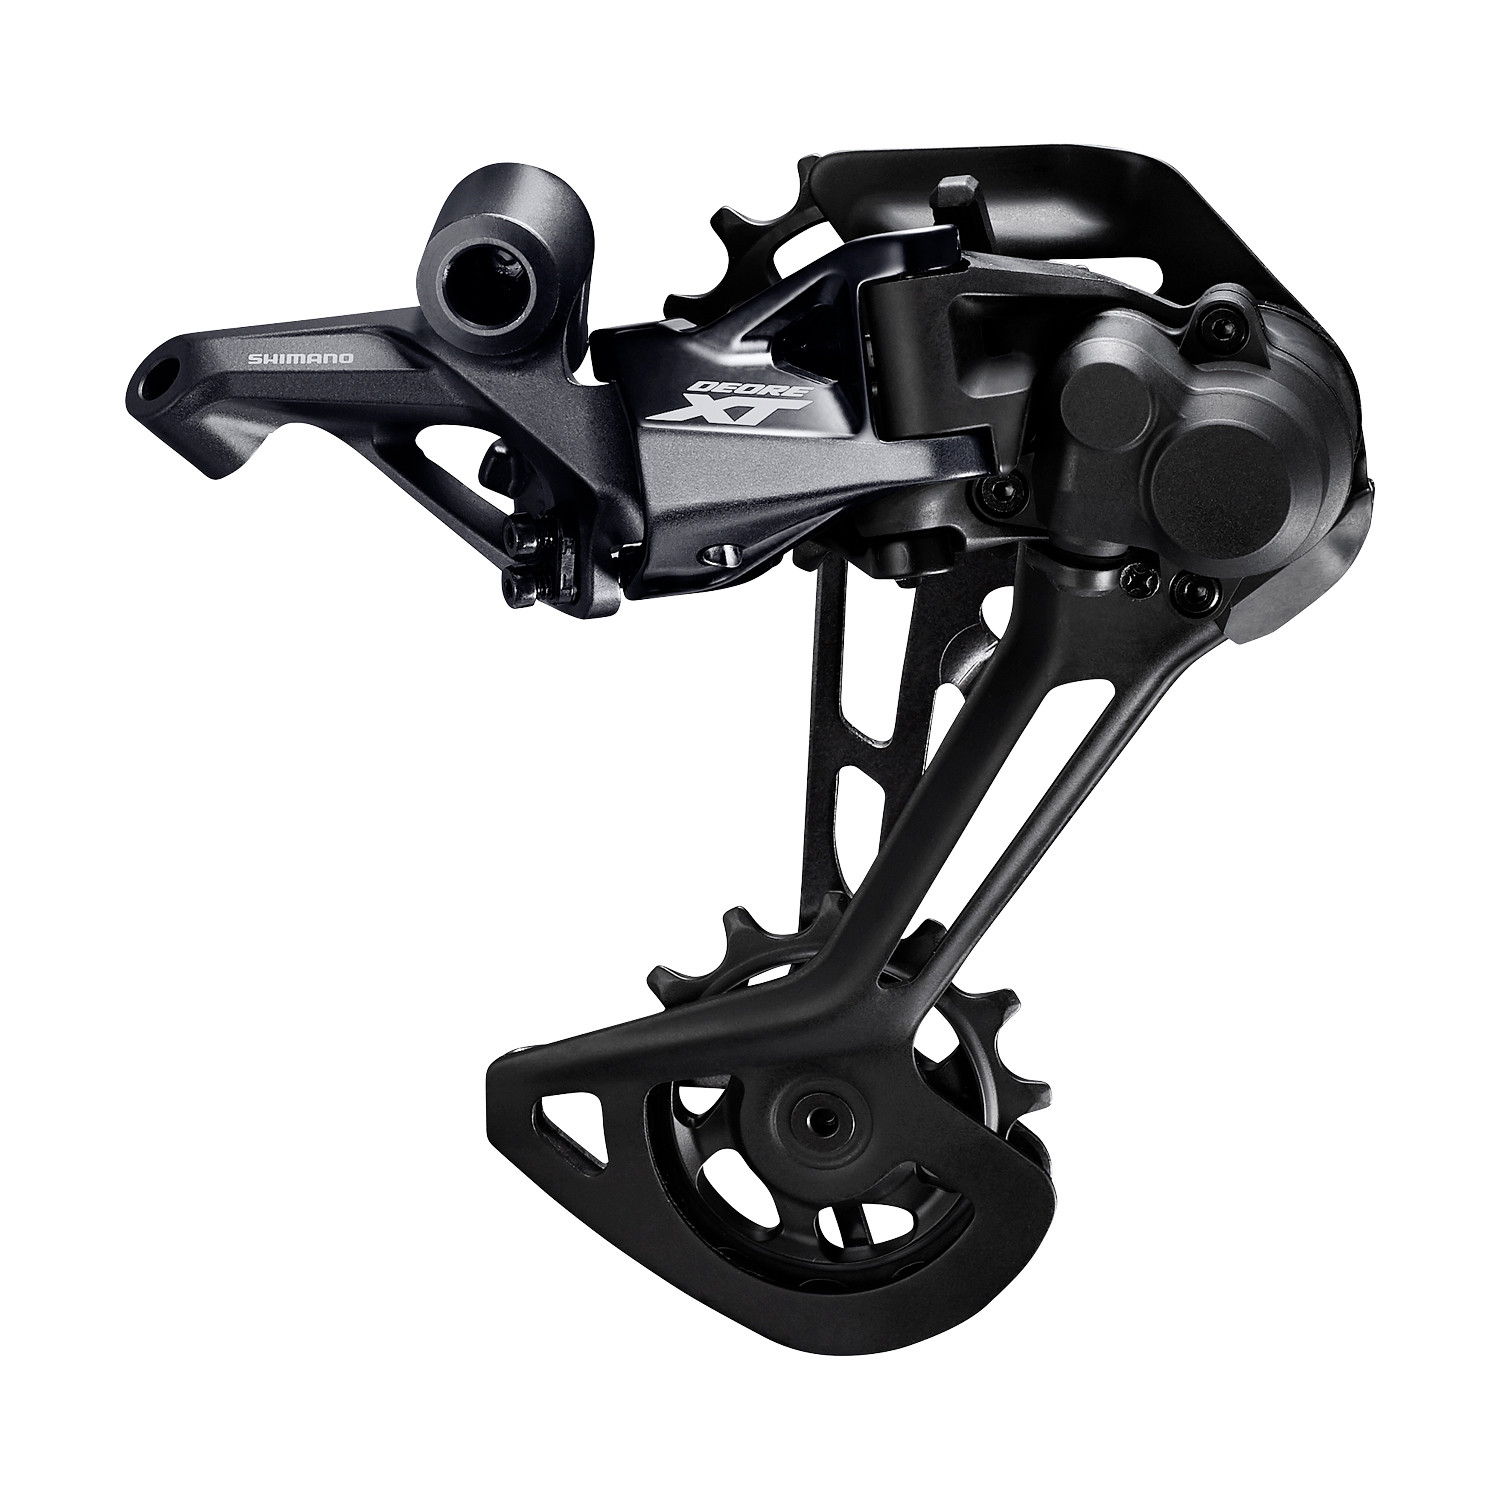
Shimano Dura Ace Front Derailleur Deore XT Rear Derailleur

Note: In the past, some mountain bike rear derailleurs worked the opposite way, i.e. they pulled cable to go to smaller cogs. These may have been called low-normal or Rapid Rise (a Shimano trademark) derailleurs.

7
  • Can you source the contentions in your Considerations section? I don't see how 1x necessarily provides greater gear range than a 2x - you can certainly get equivalent high and low gears on 1x and 2x, but 1x doesn't unconditionally mean a wider range. The average chainline on a 1x system could be worse than on a 2x, because your high and low gears are more cross chained. You'd do better to say that 1x should have fewer chain drops (from the front chainring(s)) on rough terrain than 2x.
    – Weiwen Ng
    Commented Oct 8, 2019 at 17:53
  • A typical 11 or 12 speed cassette on a specific 1x drivetrain is as narrow, or narrower than a 10spd/11spd cassette used on 2x. In addition, the crank chainring is spaced in a manner that would that would fit where a traditional middle ring would be, eliminating cross chain even further. SRAM 1x systems typically offer a 500% gear range and I was noting that the flexibility in that range comes from not having to shift to a larger front cog.
    – Lucero79
    Commented Oct 9, 2019 at 9:16
  • In a 1x system's lowest gear, the chain angle is larger than in a 2x system's lowest gear, because of the change in the chainring placement that you noted.
    – Weiwen Ng
    Commented Oct 9, 2019 at 15:46
  • Except, a modern rear hub on a 1x would be greater than 135mm often found on 2x systems, meaning the lowest gear is further outboard on a 142mm or 148mm hub. That would mean lowest gear would align far better with the front chainring than on a 2x system.BB shell width would also play a factor. There are too many variables to generalise that chain angle on a 1x is in any way adverse to a 2x system
    – Lucero79
    Commented Oct 10, 2019 at 12:02
  • If there are too many variables to generalize that a 1x system's chain angle is worse than a 2x, then I'd argue that the converse is true. One also can't argue that 1x leads to better chain angles. I have seen no literature making that statement. Also, aren't modern road bikes moving to 142mm at the rear anyway?
    – Weiwen Ng
    Commented Oct 10, 2019 at 13:36
3

Bike Chain / Roller Chain

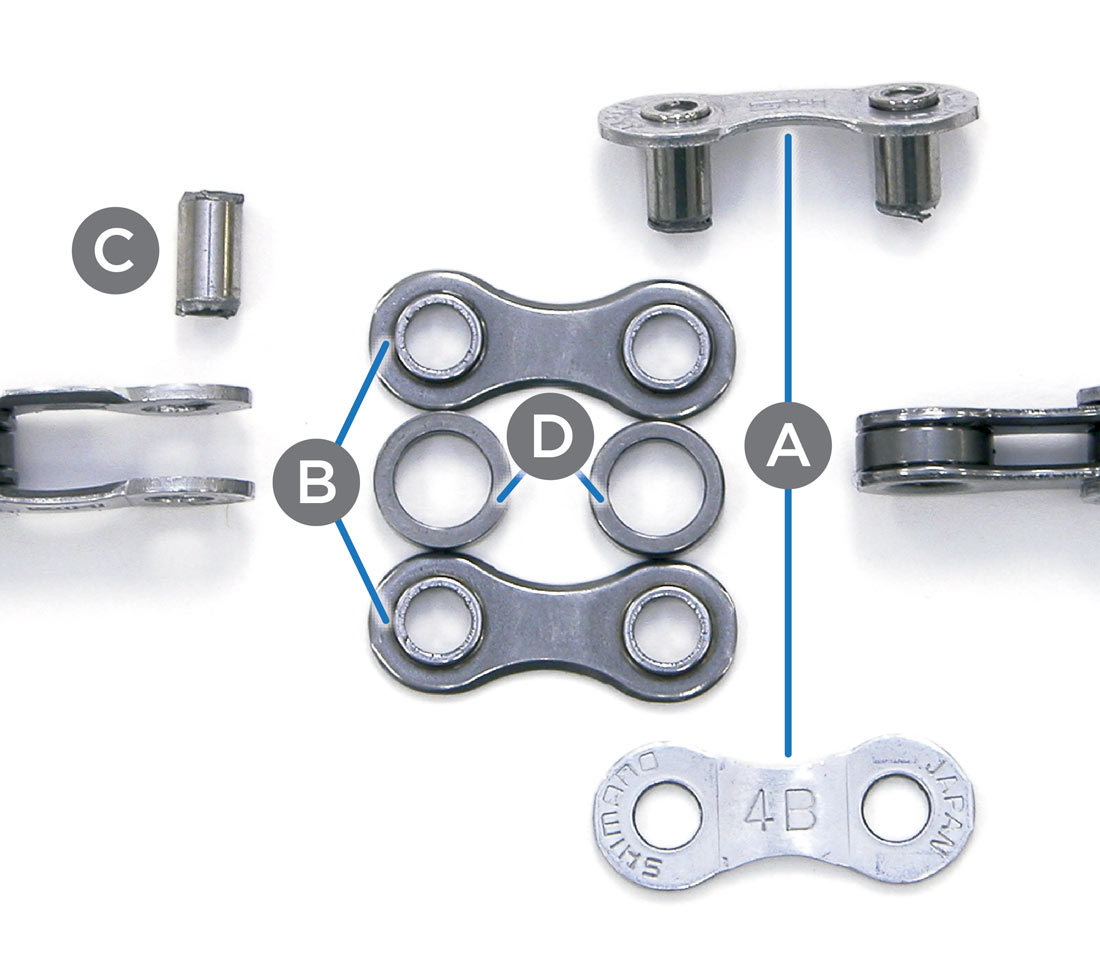
bike chain parts

Image credit: Park Tool

A bushingless chain is made of four parts:

  • A: Side Plates, a.k.a. Outer Plates
  • B: Inner Plates
  • C: Rivet, a.k.a. Pin
  • D: Rollers

A MasterLink is a special kind of Side Plate, and has a "speed" rating referring to the width of chain it should be used with.

Pitch is the nominal distance between adjacent rollers, measured center to center. Almost all bicycle chains have 1/2" (12.7mm) pitch. Some rare exceptions tried 10mm pitch in the 1980s but you're unlikely to see those today.

Wear/Elongation/"stretch" When riding, the Pins and Rollers rub against each other. Dirt getting inside the chain will accelerate wear here. As these items wear, the effective pitch of a chain increases slightly. It appears as if the chain is stretching, and this can be measured. As the chain wears, it will no longer mesh properly with the chainrings and cassette cogs, and it will accelerate wear. Thus, the chain should be replaced promptly.

For 11 speed and higher drivetrains, replacing the chain at 0.5% wear is recommended. That is, the chain appears 0.5% longer than its original length. If you replace the chain at this wear limit, the cassette will probably be okay for at least another chain. At 0.75% wear on an 11s or higher drivetrain, a new chain is likely to skip on the cassette. Much beyond this, and the chainrings may also need to be replaced. These are often more expensive than the cassette. The recommended replacement limit for 10s and earlier systems is 0.75%, and at 1% wear, the cassette often needs replacement as well.

A chain wear gauge is used to check for wear. Bike stores can check your chain, but a wear gauge is a reasonable investment for many cyclists.

Width Chains come in two main formats — singlespeed chain, which is 1/8" wide, and derailleur chain, which is nominally 3/32" wide but comes in many sub-widths for each speed count (more cogs = narrower chain) and is intended to flex sideways whereas singlespeed chain doesn't need to flex. For derailleur chains, it is generally recommended to use the correct speed count chain for the number of rear cogs your bicycle has.

Bushings Older chains sometimes had bushings between the rollers and pins, which were essentially smaller rollers made of bearing bronze. These reduced friction and slowed wear even when under-lubricated. Advances in chain metallurgy and the prospect of cheaper manufacturing result in no chains being presently available with bushings.

Lubricants Chains need to be cleaned and lubricated to reduce friction and wear. Lubricants are typically divided into wet and dry. Wet lubes are oil based. Dry lubes typically have wax in some sort of carrier solution; this will evaporate and should leave a chain that's mostly dry to the touch. As a more involved alternative, some cyclists wax their chains in molten paraffin wax, often with friction modifiers added.

On-bike chain cleaners can be used to clean the chain. Alternatively, one can remove the chain with the master link, shake it in a used drink bottle with degreaser, and then reinstall it.

Contrast with Drive Belt and Shaft Drive and Direct drive

1
  • 1
    Regarding bushings: the current para states that chain bushings were made of bronze. It's true that bronze is used for many bushings. Was that true of chains? Bronze bushings may be run dry (I think; bronze was supposed to be self lubricating). Even bushing chains were run with lube. I would've guessed chains have always been made of steel (well, some super weight weenie chains may be titanium, but let's not go there)
    – Weiwen Ng
    Commented Feb 7, 2022 at 14:51
3

Stack and Reach

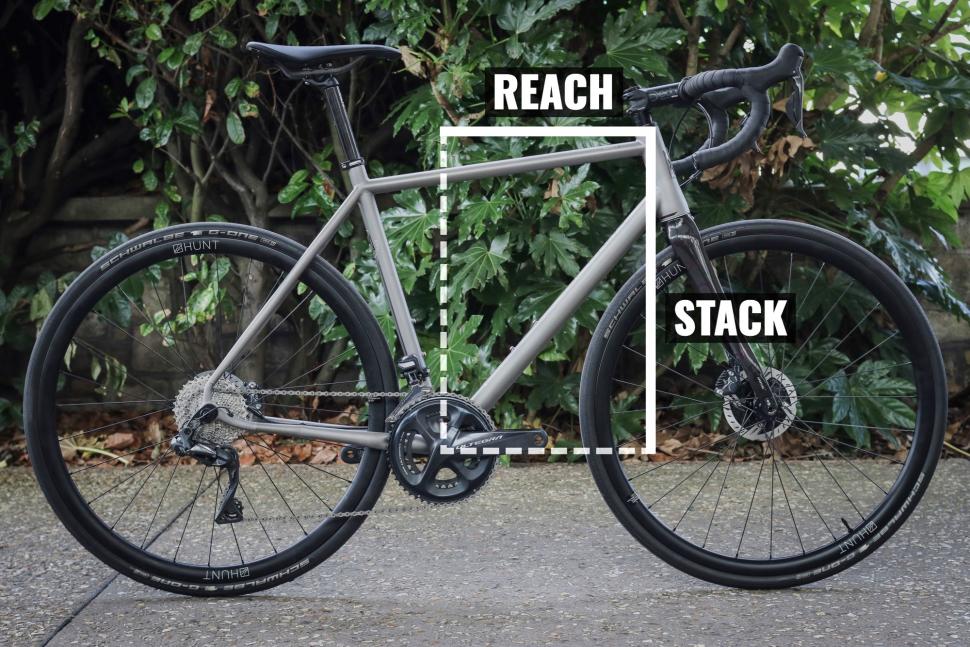
stack and reach Image credit

Stack is "The vertical distance from the centre of the bottom bracket to the central point at the top of the head tube." (ref)

Reach is "The horizontal distance from the centre of the bottom bracket to the central point at the top of the head tube." (ref)

2
  • Stack and reach is covered under the frame sizing article. Also, this wasn’t linked in the table of contents.
    – Weiwen Ng
    Commented Sep 6, 2022 at 9:40
  • @WeiwenNg ... and with even the same diagram. Still, this is an indexed list, and not everyone will think of looking under 'frame sizing' when they're searching for 'stack and reach'. An alternative (you have my blessing to go ahead and do it) is to delete this answer, but keep the index for 'stack and reach', but add a pointer saying 'look under _frame sizing \ stack and reach'.
    – Sam7919
    Commented Sep 6, 2022 at 12:50
3

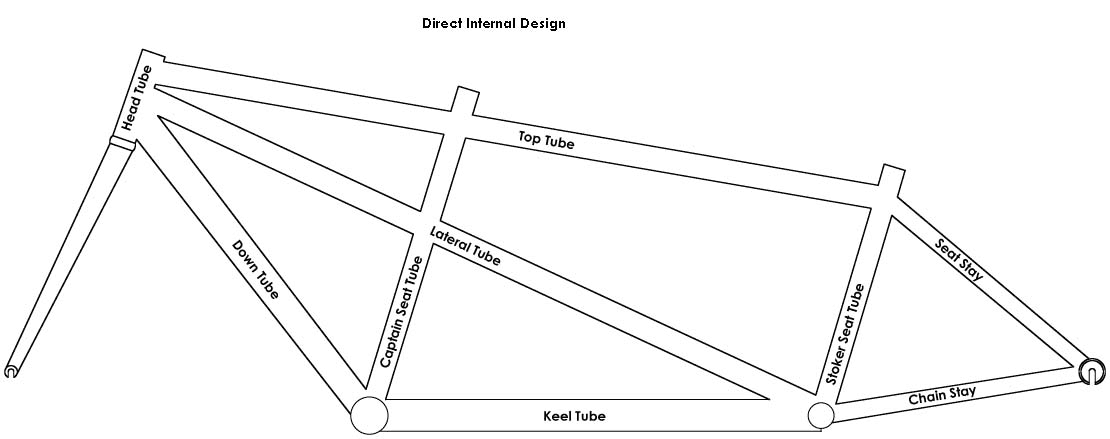
Keel Tube

Also sometimes called the "boob tube" or "boom tube" (although "boom" and "boom tube" are also an unrelated part of a recumbent.)

In a tandem, the Keel Tube is approximately horizontal, and joins the front bottom bracket to the rear bottom bracket.

This part does not exist on a double-diamond bike frame.

From https://www.rodbikes.com/articles/tandem-designs/direct-internal.gif

One might consider a recumbent bicycle frame to have a keel tube as well, but generally recumbent frames have only one main tube doing all the work, so it doesn't get a special name.

3
  • 1
    @adamrice are you sure of that edit? A quick google suggests it is many things, but not this.
    – Criggie
    Commented Dec 10, 2021 at 21:57
  • That’s there only name I know it by. You should be able to find attestations.
    – Adam Rice
    Commented Dec 11, 2021 at 3:11
  • 1
    @Criggie here is a reference for both "boob" and "boom" tube: precisiontandems.com/artbybilltandemterms.htm Commented Sep 5, 2022 at 11:48
3

Bidon. Aka water bottle.

A typical bidon.

Specifically designed to securely fit into bottle cages on the frame. Generally hold 500-750ml (22-26oz) of water; litre bottles that fit cages are becoming more common, electrolyte solution or similar depending on rider preference to provide hydration during a ride. Bidon is the French term and is likely to be understood by road cyclists.

See here for more, Cycling Weekly article.

3

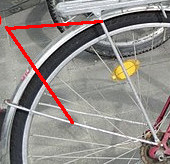
Mudguard Stays / Fender Stays

Holders/supports to attach the mudguard/fender to the frame, as pictured.

enter image description here

A single stay has two legs with one on either side of the bike, and is secured to eyelets with a bolt, or bolted into a tapped hole or rivnut. If the frame lacks mounts it is possible to use P clips or zip ties, at the cost of rigidity.

Normally made of metal for durability and impact resistance. Plastic ones exist but are uncommon.

A full rear mudguard would have two stays normally, and a front guard would have one.

Most stays have some kind of adjustment to help center the guard to avoid rub. Older stays may need bending/straightening to achieve the same effect. Modern stays would have breakaway features as well, to reduce injury if a body part got in the way.

See also "skirt guard"

3

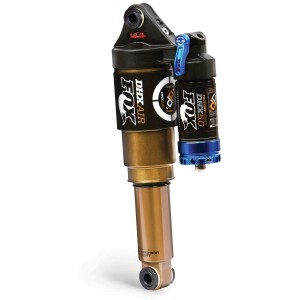
Suspension Systems

Suspension allows the wheels to displace when they encounter a bump. This helps them maintain traction in rough terrain and improves rider comfort. A suspension fork is used for the front wheel and a shock absorber (known as a "shock") is used for the rear. Suspension seatposts and stems are also available for rider comfort, but they don't substantially assist with traction.

On road and most gravel bikes, the tires deliver sufficient suspension for the terrain these bikes traverse. In contrast, mountain bikes are designed to excel on rougher terrain. Almost all MTBs have at least front suspension, aside from those who elect to run rigid MTBs. The image below shows a sample of suspension forks.

There are three main categories of bikes based off their suspension layouts:

  1. Rigid - the bike does not feature a discrete suspension system.
  2. Hardtail - only the front wheel has a suspension system.
  3. Full suspension (colloquially known as "full squish") - both wheels are suspended.

Previously, some bikes had a soft-tail suspension, with a shock unit attached between the seat stays and the seat tube. These gradually fell out of favor.

Some frames feature built-in suspension features such as curved seatstays, decoupled frame tubes (such as Trek's IsoSpeed) and elastomeric inserts (such as Specialized's Zertz system). These are generally not considered suspension systems in the context of the above classification due to their very limited range of travel and the absence of dedicated suspension components.

Front Suspension Fox Front Forks

Typically, in Cross Country (XC), All Mountain (AM), Enduro or Aggressive Hard Tail frames (ie, those that have no rear suspension), front fork travel can range from 100mm to 160mm travel dependent on the frame geometry.

Many modern forks offer a lockout (either a lever on the fork itself or a remote lockout mounted to the handlebar) which allows the rider to quickly disable the fork travel. This is useful when riding on road to provide a rigid platform so as not to unduly waste rider effort.

Rear Suspension

Rear shock
(source: bouncecycles.co.uk)

Typical rear wheel travel for mountain bikes ranges from 100mm to 200mm depending on the frame discipline with Down Hill (DH) bikes offering the most travel (roughly 200mm front and rear). On the other side of the spectrum, race-oriented XC bikes may feature much less than 100mm of rear suspension, and a few gravel bike models have just a few mm of suspension (most are rigid).

Note that while front suspension travel is fairly easy to measure and visualize, the rear suspension is a bit more complicated. Due to the need to maintain frame rigidity and give the bike desirable ride characteristics, rear suspension is generally based on a linkage system where a small shock movement is multiplied into a larger wheel movement. Hence, it is important to distinguish between wheel travel and shock travel.

Linkages are carefully designed arrangements of rigid links and flexible pivots. There exist many different layouts, each with their own set of tradeoffs and ride characteristics. Choosing one you like may be an important consideration when purchasing a full suspension bike. Note that with carbon fiber frames, pivots with a small range of motion may be implemented via intentional frame flex, eliminating the metal hardware that would have otherwise needed to be there.

Similarly to front suspension, some rear shocks offer a travel lock out which limits the rear shock travel, useful for riding on tarmac or more predictable surfaces.

Some key concepts

At their core, good suspension consists of an energy-storing device (normally some sort of spring) and an energy-dissipating device (called a damper). I say "good" because low-cost suspension found on BSOs often lacks the damper and therefore behaves more like a pogo stick than a suspension system.

The primary options for springs are:

  • Coil-sprung: the suspension uses a metal spring – normally steel, but sometimes titanium on more exotic bikes. Spring stiffness is changed by installing different springs.

  • Air-sprung: the suspension meanwhile features a cylinder containing compressed air and one or more pistons. Spring stiffness is changed by changing the air pressure.

  • Elastomer-based systems rely on rubber or another elastic material to compress. These typically offer less travel than the other two types but are lighter and easier to produce (and were hence often found on the earliest suspension forks). The elastomer is prone to degradation due to oxidation and wear and tear. Spring stiffness is changed by installing different elastomers.

Some key terms are:

  • Travel: how much range of movement the wheel has. Very roughly speaking, more enables you to handle rougher terrain.

  • Bottom out and top out: when you hit a bump, if the suspension system reaches the limit of its travel, it has bottomed out. If you have too many harsh bottom outs, you need more suspension and you also risk damaging the suspension. Conversely, a suspension system will rebound after taking a hit, and top outs occur when it hits its travel limit on the rebound. Suspensions may have rubber bumpers inside the suspension chambers to prevent damage if it bottoms out.

  • Sag: when you sit on the bike, your weight compresses the suspension to some extent. This is called sag. Notably, suspension manufacturers may recommend that you set the sag to be a certain percent (usually 15-30%) of the total travel. This is done by tuning the spring stiffness (which is also how you accommodate different rider body weights).

  • Compression damping and rebound damping: There are two main types of damping: compression (when the suspension retracts) and rebound (when it extends). These are usually adjustable using knobs on the fork or shock. More compression damping means more resistance as the fork compresses, which feels firmer. You can similarly adjust the amount of rebound damping.

  • Suspension tuning: this refers to the act of adjusting all the suspension's parameters: spring stiffness, compression and rebound damping, air volume, damper shim stack, etc. The goal is to obtain a suspension system that works best for a given rider's weight, riding style, local trails, and preferences. Defining "best" is usually a mix of riding faster and more comfortably.

Maintenance

Suspension systems require periodic maintenance. Riders should gently wipe the stanchions (the metal sliding surfaces) after each ride, and inspect for scratches. Periodic higher-level maintenance may involve replacing the fork seals, which keep dirt out of the suspension chamber, lubrication, possibly rebuilding springs and replacing bushings. Manufacturers will publish recommended maintenance schedules.

Newer cyclists riding only on paved paths should consider foregoing a suspension system. The prime reason is that suspension is not necessary for this use case, and furthermore a suspension fork requires maintenance and will eventually seize without maintenance - at which point it is just dead weight that you paid extra for.


2

Lateral Tube (on a frame)

In a tandem, the Lateral Tube is an optional reinforcing tube that is not the top tube, the downtube, nor the keel tube.

From https://www.rodbikes.com/articles/tandem-designs/direct-internal.gif

For tandems the lateral tube is normally a single. However a frame may have two smaller tubes, with one on each side. This allows a continuous tube to go around the seat tube rather than two ends being welded to the seat tube.

Variations

Some tandems lack a Lateral tube, and simply have a quadrilateral space under the stoker. Some have a Lateral tube and no top tube. Some may even use a single large tube to provide an easier step-through design.

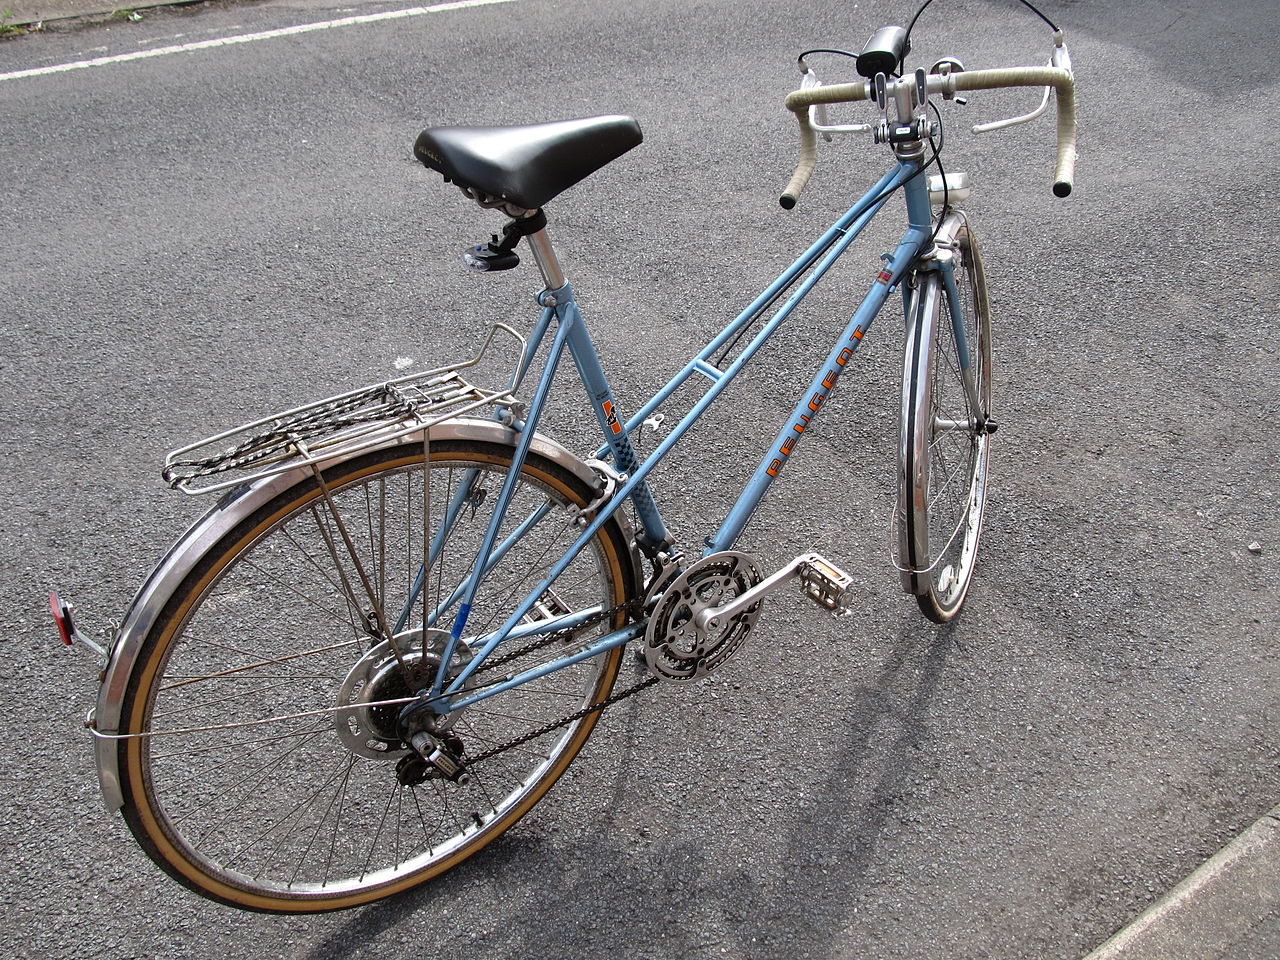
The Lateral tube has a parallel on a Mixte frame where the tube or tubes continue down to the rear axle.

By Rwendland - Own work, CC BY-SA 3.0, https://commons.wikimedia.org/w/index.php?curid=21142240

1
  • This answer could be improved by providing the correct name for the twin tubes on the mixte frame, either as its own entry or inserted into this one. I don't know whether they're top tubes or a pair of laterals or some other name.
    – Criggie
    Commented Dec 28, 2020 at 9:31
2

Boom / Boom Tube

Any frame part of a bike that is in front of the head tube, excluding carriers or decks for cargo.

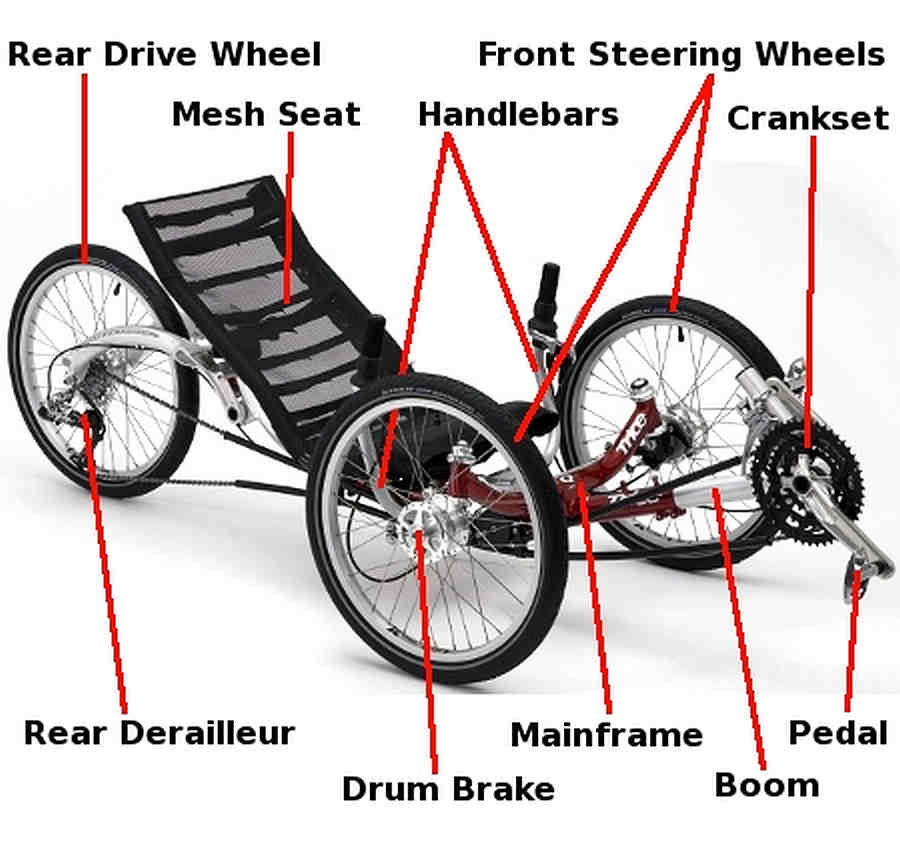
A Boom is almost always found on a recumbent or semi-recumbent frame where the bottom bracket is in front of the head tube. Pictured is a Tricycle recumbent, though the same terminology applies to a two-wheeler recumbent bicycle as well.

https://tadpolerider2.files.wordpress.com/2015/03/anatomy-ice-trike.jpg

A Boom allows the frame to be adjusted for a rider's leg length. As such, boom adjustments will almost always require a chain length adjustment unless very minor, as well as front derailleur tweaks. A device called a "chain gobbler" can be fitted to recumbents who change riders a lot, like rentals, though they add about as much drag as a chain tensioner or derailleur.

The Boom Tube is normally a round, occasionally a square or profiled tube of 2-4 inches (50-100mm) diameter. There is a slot underneath and a couple of pinch bolts, exactly like a seatpost clamp from the 80s or earlier. A QR probably won't generate enough clamping force here.

The Boom itself is a T shaped tube that is just small enough to slide into the Boom Tube and be clamped onto by the pinch bolts. At the other end is a conventional bottom bracket ready to accept a BB axle or cartridge, and a crankset.
The boom will probably have a short 6" or 150mm stub tube that replicates the mounting for a conventional front derailleur, and may provide a mount for a front light.

The Front Derailleur control cable may be internal though the boom, or externally routed. For booms that get adjusted a lot, an external housing makes sense.

A crank-forward bike or Semi-recumbent generally still has its cranks behind the front wheel, so does not have a boom.

2

BSD (Bead Seat Diameter)

A measure of the diameter of a wheel rim, for the purposes of tyre sizing. This is the vertical distance from the center of the hub to the shelf in the rim where the tire beads sit.

Common modern BSD sizes include 622 mm (700c road or 29er MTB), 584 mm (27.5" MTB or 650B road), and 559 mm (26" MTB). 571mm (650c wheels) is less common; it is used on some older triathlon bikes and some road bikes for smaller riders.

The European Tyre and Rim Technical Organization (ETRTO) and the International Organization for Standardization (ISO) defined this measure and how to measure it, and played some role in standardizing wheel sizes.

2

Lights

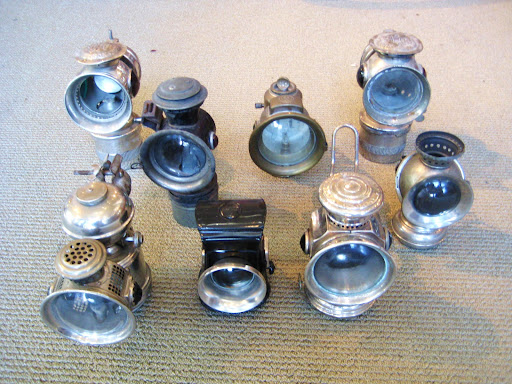
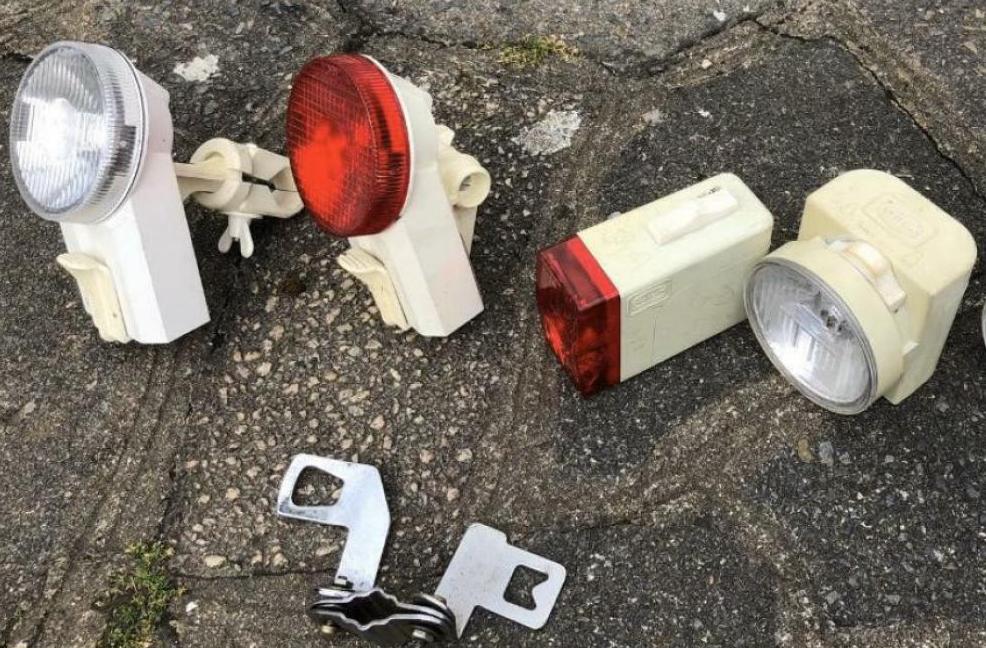
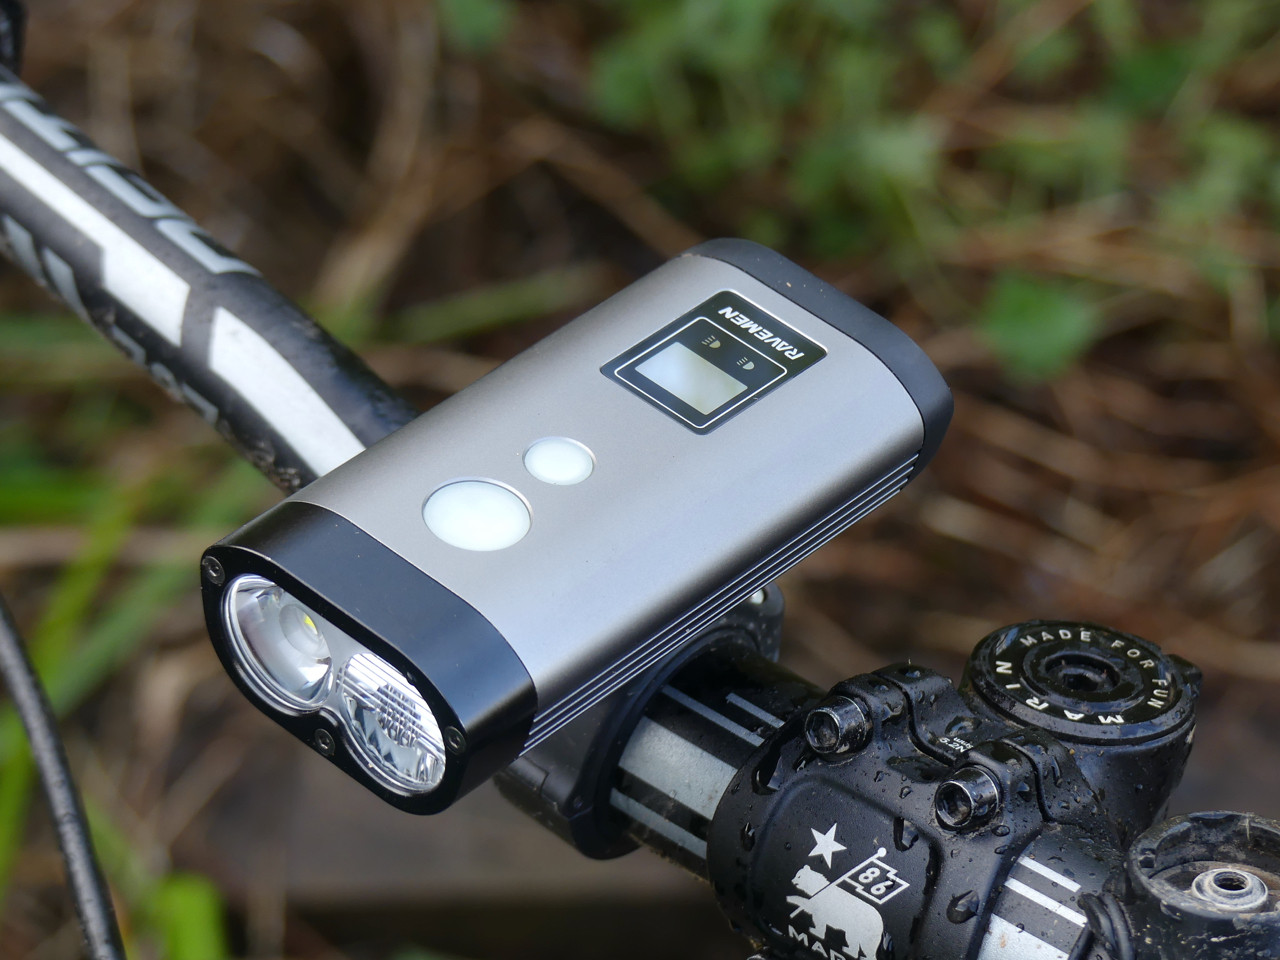
Units that provide illumination while you ride your bike. Energy will come via electricity in any modern light, but early lights may have been fuelled by kerosene or other combustibles. Modern lights will be LED-based, and older ones could have an incandescent filament lamp inside.

Vintage Kerosene lamp Early liquid lights

80s Eveready lights 1980s style, incandescent

Ravemen modern LED light Modern LED rechargable light

Most lights are detachable in some way, but a few bikes will have lights designed into the frame. These are unusual, and will likely only be LED based.

Internal lights


Seeing Lights

Bright lights for illuminating a dark road or track, for the rider's benefit.

Lights in this category are powerful enough (upwards of a thousand lumens or so) to let the rider clearly see the terrain ahead for several meters, even while riding at speed. These are best used when avoiding glare in other road users' eyes is a secondary concern, such as when mountain biking at night, or when riding on deserted roads. An analogy could be drawn to the high beams on a car. Inappropriate usage of seeing-type lights — for example on crowded roadways — can be counterproductive as other road users are likely to be dazzled by the blindingly intense light, obfuscating their vision.

Be-Seen Lights

Smaller lights with a wider FOV so that other road users can see the rider.

Like the low beams on a car, be-seen lights are primarily intended to delineate where the bike is on the road by being just powerful enough to be seen without risking dazzling other road users. Their purpose is not to illuminate the road surface, although that may be a secondary benefit. These are best used when street lighting is adequate to spot road markings and hazards, but inadequate for other road users to easily see the cyclist. They are not recommended for off-road use as their light output may be too dim to see trail features.

Daytime Running Light (DRL)

Physically small lights used on a bike during daylight hours, to help with being seen during the day. Long runtime and bright output requirements means these have only been a thing since this century. Studies have proven that cars and trucks benefit from DRLs especially in bad and marginal weather, so any road user would gain visibility by having lights.

There is not a lot of difference between a DRL and a "Be-Seen" light, other than the time of day they are in use. Laws differ by jurisdiction regarding the use of flashing or other non-steady light patterns.

(a somewhat `shopped) scene of riders in a shadowed gully, with DRLs.

Passive lights, aka Reflectors

TBC Unpowered passive optical devices designed to bounce light back toward a source.

Corner reflectors, Tape, increased performance over time, colours

Rear lights

TBC

Other notes

TBC Batteries, Lithium/Dry cell/dynamo/other?

Flashing vs steady, and halfway-throbbing ones. Mandates in EU about cutoff and dynamo.

Laser lines on the road.

2

REI

Recreational Equipment Inc is an chain store based in the United States that specialises in outdoor goods, sporting equipment, and outdoor clothing. REI may be thought of as a mega-LBS because they have a specialist bike department and staff who ride, and bike mechanics on site. Retail store chains like Target and Walmart do not have a similar capacity.

REI is incorporated as a co-operative, in contrast to traditional for-profit retail chains. There's a one-time fee of US$20, and no renewal fee. Members are also allowed to vote for the board of directors. Membership is not required to shop in the stores.

More details at the Wikipedia article

Company website is https://www.rei.com/

1
  • 3
    You can shop at REI even if you're not a member. you get some rewards and voting abilities if you are a member.
    – Batman
    Commented Aug 6, 2016 at 13:20
2

Rim brake, e.g. cantilever, U- or V-brake, single or double pivot brake, side-pull brake

Brakes help you control your speed and stop. Rim brakes include all types of brakes that push pads onto a rim's brake track. Park Tools has a page dedicated to identifying rim brake types. Rim brakes may also be called caliper brakes. Alternatively, "brake caliper" is a generic term for an item that squeezes the sides of the rim, and it houses the brake pads and bolts to an attachment on the frame. This usage stems from the measuring device, but the term is also used to refer to disc brake calipers.

Typical maintenance on rim brakes involves replacing the pads. Pads should have a wear line, and if the pad is worn to the line, it should be replaced. The pads on lower-cost rim brakes are often ineffective at braking. You can often get a noticeable improvement by switching to pads from a reputable manufacturer. Kool Stop's pads are frequently recommended. Some models of brakes have pads that slide out of holders. Other, usually cheaper, models have the pads integrated with the holders or posts, and these are replaced as a unit.

Rim brakes for drop bar bikes: center pull, side pull, single and dual pivot

Drop bar bikes have typically mounted the front caliper in the middle of the fork crown, and the rear one in the middle of the chainstay bridge. Types have included center pull and side pull brakes. Single pivot and dual pivot brakes are types of side pull brakes, with dual pivots being stronger. Cyclocross bikes have historically used cantilever brakes, or sometimes mini-V brakes with cable pull suitable for road levers. Notably, road and MTB brake levers have different cable pull ratios, so one does not typically use MTB V-brakes with a drop bar brake lever (although adapters exist).

Rim brakes and MTBs

MTBs have used cantilever brakes, later transitioning to V-brakes, and later transitioning to disc brakes. At the time of writing, newer drop bar bikes are generally transitioning to disc brakes, although many older rim brake models exist.

In theory, rim brakes have some disadvantages to disc brakes. Rim brakes don't stop as well in wet weather, and they do eventually wear out the rims. However, they are cheaper and are a lot less sensitive to misalignment than disc brakes. Mountain bikes switched to disc brakes some time ago. Road bikes are in the process of transitioning, and in 2021, many newer bike models do not have rim braked options.

Other types of brakes include disc brakes and hub brakes, e.g. coaster brakes.

2

Frame Sizing

Bicycles may have nominal sizes, e.g. extra small through extra large, or they may have a centimeter size (e.g. Specialized's road frames in 2021 have 44cm, 49cm, 52 to 58cm in 2cm increments, and 61cm). Manufacturers usually recommend a range of heights for each size.

In the past, road frames typically had equal length seat and top tubes, and their top tubes were parallel to the ground (as in the picture in the header). The frame's centimeter sizing corresponded to the length of the seat tube. Mountain bike frames had sloping top tubes (i.e. not parallel to the ground) from the beginning, and most road frames adopted a similar design. Modern road bikes' centimeter measurements do not typically correspond to their seat tube lengths. Frames with sloping top tubes may be called compact frames, and they look like the picture below.

Height ranges are an approximate guide. People can have relatively long legs for their height, or the reverse. Your local bike store will be able to help you determine the correct size in person.

X- and Y- dimensions

If you are sizing yourself, there are two schemes to measure frame size. It is important to know how long the bike is (i.e. the length on the X-axis), and how tall it is (i.e. the Y-axis). Once you know a range of bicycle sizes in either measurement scheme that work for you, you can select potential bikes more easily. Keep in mind that you can also adjust the stem length and its vertical height to alter the position of your handlebars.

The effective top tube length (diagram below) measures the former. This is what the top tube length would be if the bike had a level top tube; most new bikes these days have sloping top tubes, and the degree of slope can vary. The bike's seat tube length is the other parameter to know in this scheme. Beware that seat tube length can be measured to the center of the seat tube/top tube junction, or to the very top of the seat tube. There can be as much as a 20mm difference in length between the two types of measurement. A geometry chart will typically state if seat tube is measured center (of the bottom bracket shell) to center or center to top.
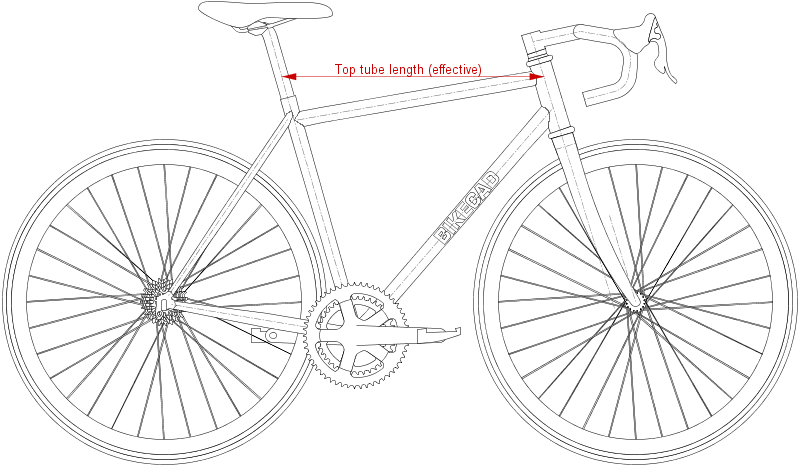
enter image description here

Now, manufacturers also provide stack and reach dimensions. These measure the bike's horizontal and vertical dimensions from the center of the bottom bracket to a point at the top of the head tube. This takes the seat tube angle out of the equation, discussed below.
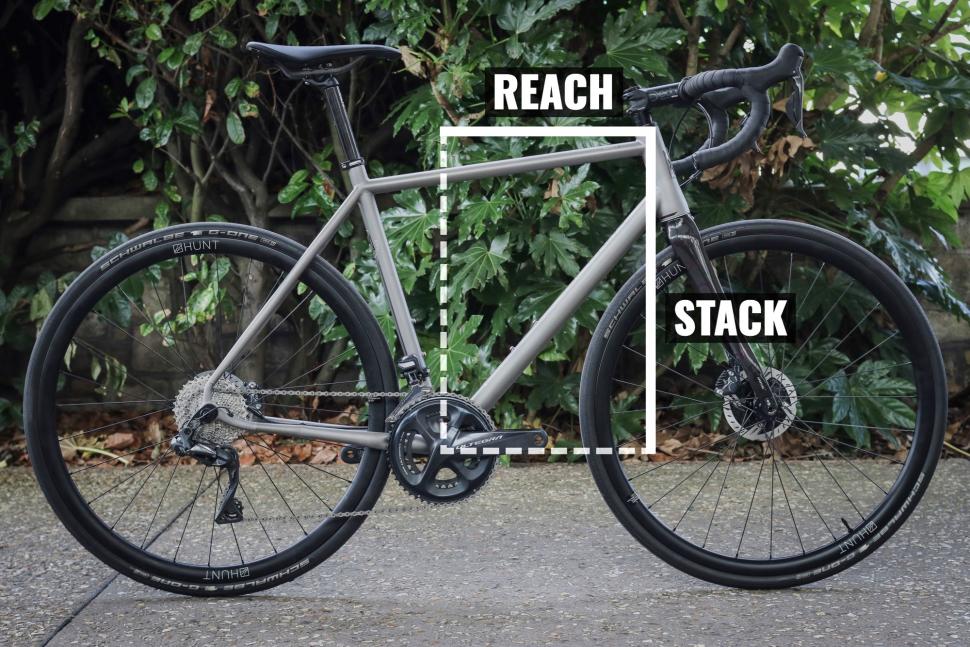
enter image description here

Keep in mind that typical ranges of x- and y-dimensions for a given size will vary by bicycle discipline (e.g. endurance road bikes have lower reach and greater stack than road race bikes; many modern MTBs are designed for short stems and flat bars, so their reach dimensions will be long compared to road bikes) and by manufacturer.

Bike design paradigms

There are systematic differences in body position among bicycle types. To some extent, they can be summarized as the ratio of stack to reach. Performance-oriented or race-oriented road bikes tend to favor long and low body positions. Some more leisure-oriented riders might not be able to achieve their ideal positions on a bike that is too racy. They may be better off on endurance road bikes, which generally favor more upright and less stretched out torso positions that are more comfortable.

Among gravel bikes, many are built like endurance road bikes. However, many also take design cues from MTB geometry. MTBs and MTB-oriented gravel bikes tend to favor relatively long top tubes and are designed for short stems. This aids handling in rough off-road terrain.

There is no shame in riding a less racy bike. Riders should seek a position that is comfortable for them, even if they are on a race bike.


Secondary measures

Seat tube angle and seatpost setback/offset

Bicycles typically come in a small range of seat tube angles (STAs) for a given size range. Frames for average men usually have STAs around 73 degrees, with the angles steepening on smaller bike sizes and slackening on larger sizes. Some bikes, particularly mountain and triathlon bikes, may give a virtual STA. This is the STA if the bike had a straight seat tube. The steeper the STA, the further forward you sit on the bike, although remember that you can adjust your saddle position fore and aft. STA does affect the effective top tube length, but not the reach. A steeper STA pushes the whole top tube forward, so the reach would be longer.

Seatpost setback or offset describes if the saddle rail clamp is in line with the post (i.e. 0 offset or straight, commonly seen on mountain bikes), or if it is to the aft of the centerline of the seatpost (15-20mm rear offset is common on road bikes, although there may be some posts with more). Seatposts with setback position your saddle further aft by default.

Most riders should be able to achieve their ideal saddle fore-aft position on most combinations of STA and offset. As always, there may be exceptions for unusual body proportions and/or preferences. For example, if you prefer a very far forward position (e.g. you have short legs or you just prefer it), you may want a zero offset seatpost regardless of frame seat angle. It is possible that you may not be able to get your saddle far forward enough on some frames with slacker STAs. The reverse is true if you prefer to sit further aft; you may want to default to a setback seatpost, and avoid frames with steep STAs. Secondarily, the size of the seatpost's rail clamp can reduce the amount of fore-aft adjustment available.

Do note that STA does interact with top tube length but not with reach. If you fix the top tube length, a steeper STA will give you longer reach.

Head tube length

This affects how much vertical adjustment you can make to your handlebar position. This is less of a concern if your frame size is correct. It is possible that you might have to use excessive spacers (e.g. over 40mm, but see your bike manufacturer's guidelines) to get your handlebars high enough to be comfortable. However, if you need to do this, it may be a sign that you're on the wrong size of bike or on the wrong type of bike (e.g. you should be on a endurance road bike rather than a performance road bike).

Standover clearance

This is the distance from the ground to the top tube. On bikes with sloping top tubes (i.e. most of them), clearance is usually stated from the ground to the center of the top tube. When wearing cycling shoes, you can measure the distance from the floor to your crotch and compare.

In the past when road bikes had level top tubes, if you had about an inch of standover clearance, that was a potential indicator that the frame was the correct size. This is not as important as the other basic frame measures.

Wheel size

Almost all road bikes are sized around 700c wheels. For shorter riders, e.g. under about 5'4" or 163cm, smaller wheels like 650B or 650c may be more appropriate. The smaller stock frame sizes will tend to have more toe overlap, i.e. the front wheel can hit your foot when you turn it. This can often be adapted to, especially on road bikes when you only turn the wheels at very low speeds. However, it can also be disconcerting. Some major manufacturers offer smaller bikes in smaller wheel sizes, but not all do.

Custom frames

Riders with body proportions significantly outside the norm may wish to consider a custom frame at some point. Many custom frames are obviously expensive, but not all are. You can ask around your local bike shop for any local framebuilders they know of, or search the internet.

Frame geometry and handling

While this is not directly related to stack and reach, other parameters of the frame's geometry affect how it handles. A more complete discussion is here, but frame geometry is complex. One oversimplification is that bikes can be made more stable (more effort to initiate a turn, bike tends to remain upright, easier to ride hands-free) or more agile (less effort to initiate a turn, bike feels like it dives into the turn).

2

Recumbent cycles

Recumbent cycles come in two, three and four wheeled versions, in many different shapes and with many different riding characteristics. The only thing they all have in common is that the 'bottom bracket' is not low down between the wheels but farther forward and farther up.
The sitting position is almost never bend over forward but can be anything from straight up to almost flat back, although some people will only call a cycle a recumbent if the seatback leans back by at least a given angle. Colloquially, recumbent bikes may be called "bent bikes" or "bents", and recumbent cyclists may refer to upright bikes as "wedgies."

Steering can several different ways, most commonly called above seat steering and underseat steering, can be direct or with a rod or more advanced ways as dictated by the geometry of the cycle and the wishes of the builder.

Because of the basic position, not needing to lean on your arms while riding, and the wide variations in models and options, recumbents are often adjusted for use by people who have some limitations. That goes from moving the brake leavers to be on the same side, to replacing the bottom bracket with cranks and pedals to a hand driven power system.
Trikes are more often adjusted as they allow for more limitations, like loss of balance or loss of the use of one arm or leg.

More information in this Wikipedia article.

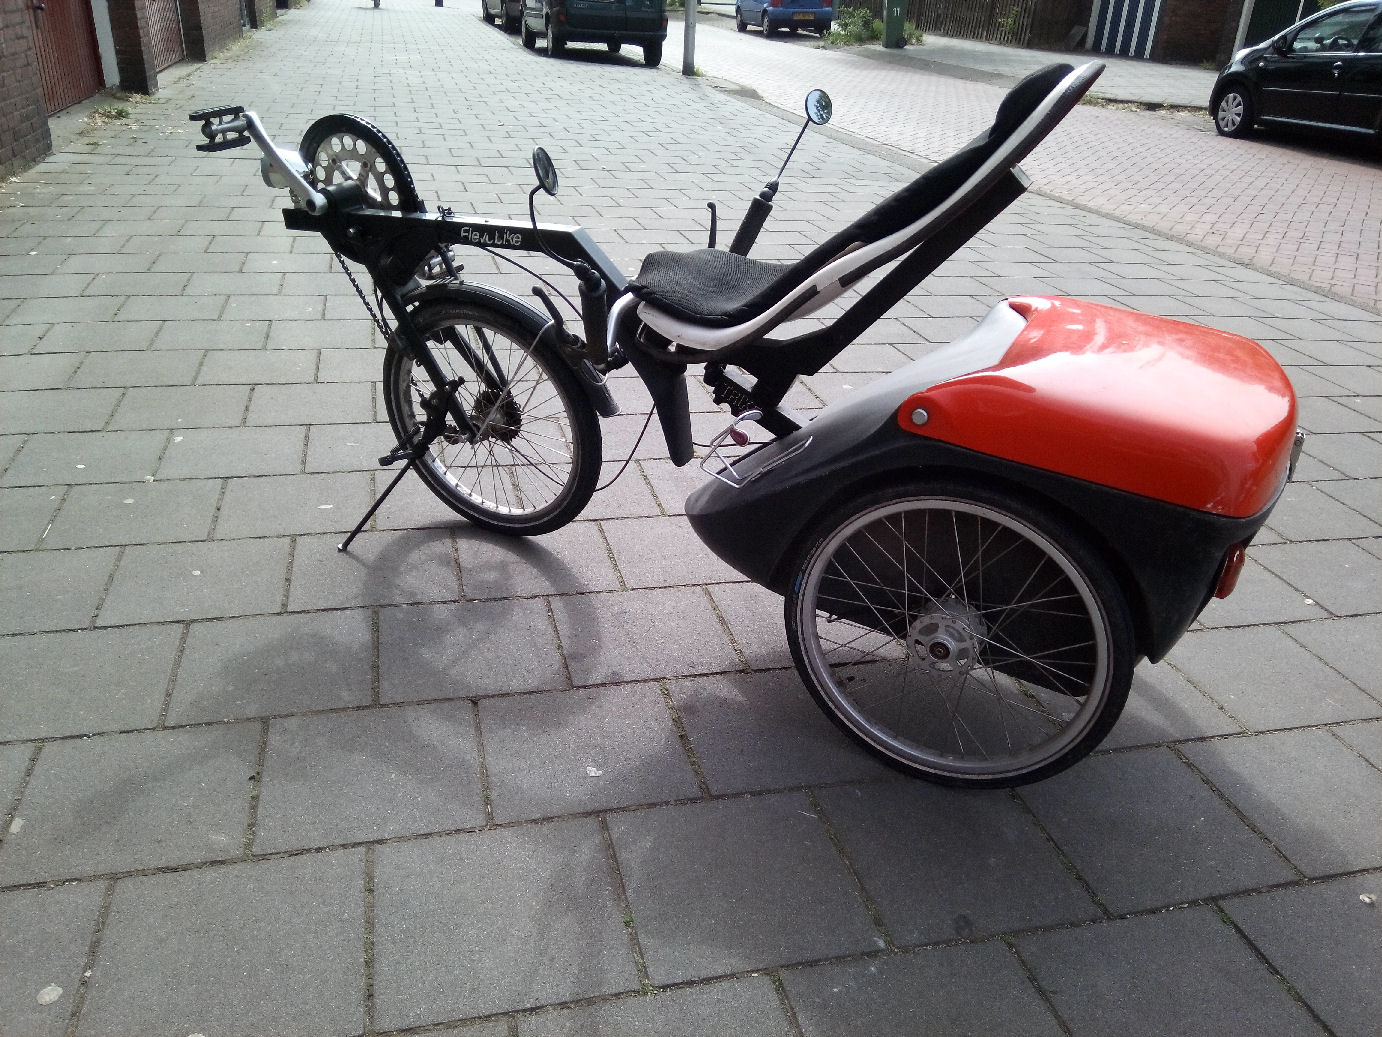
Flevotrike
This is a Flevotrike which has underseat handlebars but an unusual steering method, in which there is a pivot point under the seat and the whole of the front, including the front wheel drive, tilts. Photo by me, trike owned by me.

Boom tubes are frequently found on recumbents but not on upright bikes. Velomobiles are a class of recumbent bike enclosed by a fairing.

2
  • I can imagine a one-wheeled recumbent, briefly, as a unicycle transitions from vertical to horizontal !
    – Criggie
    Commented Nov 27, 2021 at 22:04
  • 1
    I have recently seen a photo of a one wheel motorcycle, where rider and motor are within the huge wheel. I can see one such in recumbent cycle riding position but have never seen nor heard about one wheel 'bents.
    – Willeke
    Commented Nov 27, 2021 at 22:59
2

Cassette

A stack of cogs on the rear axis to provide changeable gears. It is held on a hub by the threaded lockring.

Cassette next to freehub

Cassette next to the hub (image credit).
The cogs may be separable or more often some or all are riveted together for convenience. A few smallest (fastest gears) cogs are more often separable; they wear faster than others and this way can be replaced individually. The smallest cog may cost a tenth of the price of the complete cassette or even less.
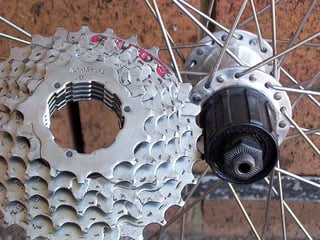
Cassettes designed for different number of gears (cogs) often have different spacing between cogs and generally cannot be swapped. Different vendors are usually not compatible. There are exceptions like all Shimano cassettes up to 7 cogs inclusive have the same spacing. In some cases compatibility can be achieved with additional spacers. More about the compatibility can be found here.

The modern derailleur moves not just along the rear axis but also diagonally. Due this, there is both minimal and maximal limit for the number of teeth on both smallest and largest cog. You cannot just pick a cassette that fits your life style the best.

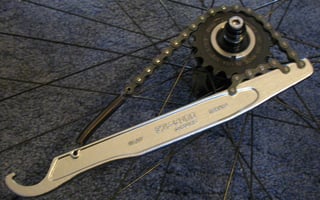
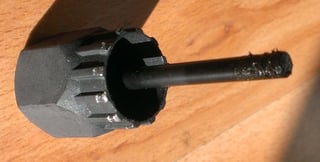
The cassette can be easily unscrewed from the wheel with two specialized tools, the "park tool" (a wrench for the lockring) and the "chain whip" (see the picture below).

Chain whip

Chain whip (image credit).

The whip holds the cassette in place, otherwise it would rotate even if you hold the wheel, because freewheel would allow in this direction. The chain whip may be gear number specific (because the chain on it is), or for a limited speed range. It is not required for putting the cassette back onto the wheel because the freewheel mechanism blocks the rotation in this direction. The lockring must be quite strongly tightened (40 Nm).

The park tool may be vendor specific (true for Campagnolo) or multiple vendors may support the same standard (often Shimano). Many are designed for a usage with the external wrench (23.4mm), others have they own handle.

enter image description here

The park tool (image credit, edited).

With the suitable chain whip, park tool and matching cassette, the replacement is actually easy (replacing tire is more work). The axis of the modern freewheel only accepts cogs in one exact orientation so these cannot be placed wrongly. Spacing between cogs of the assembled cassette must be the same for all cogs. If not, likely a spacer between cogs is missing or in a wrong place.

Cassettes serve less than a bicycle in general and are replaced when worn. The worn cogs start skipping under load, this cannot be fixed by adjusting any screws and putting a new chain at this time actually worsens the problem. When very worn, some cogs just skip with no traction, but makes sense to replace earlier. Worn teeth are visually recognizable from they shape when they were new. Worn cassette also significantly reduces life of a new chain if put in this combination.

2

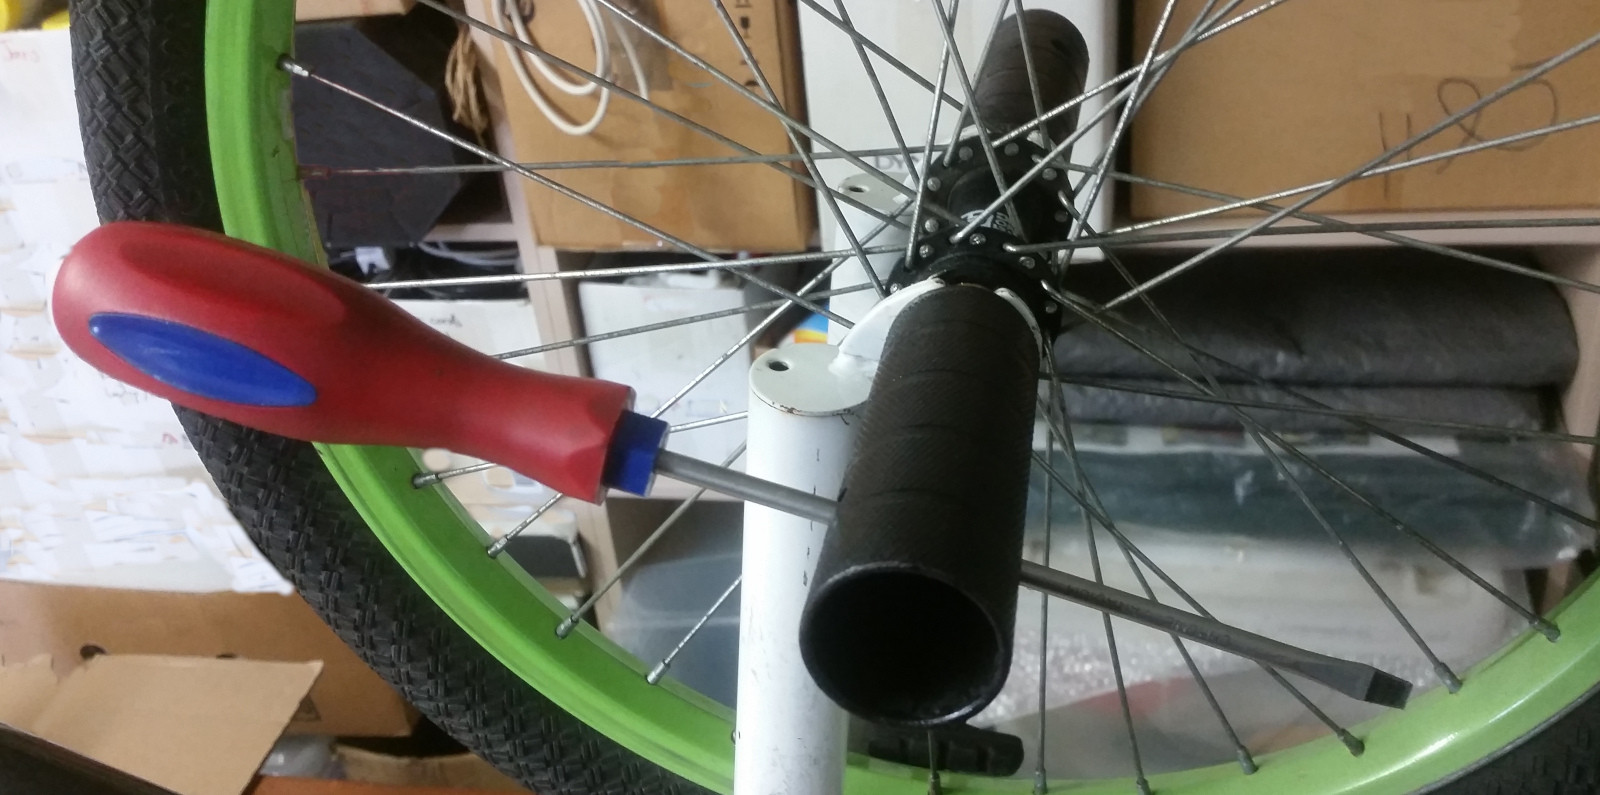
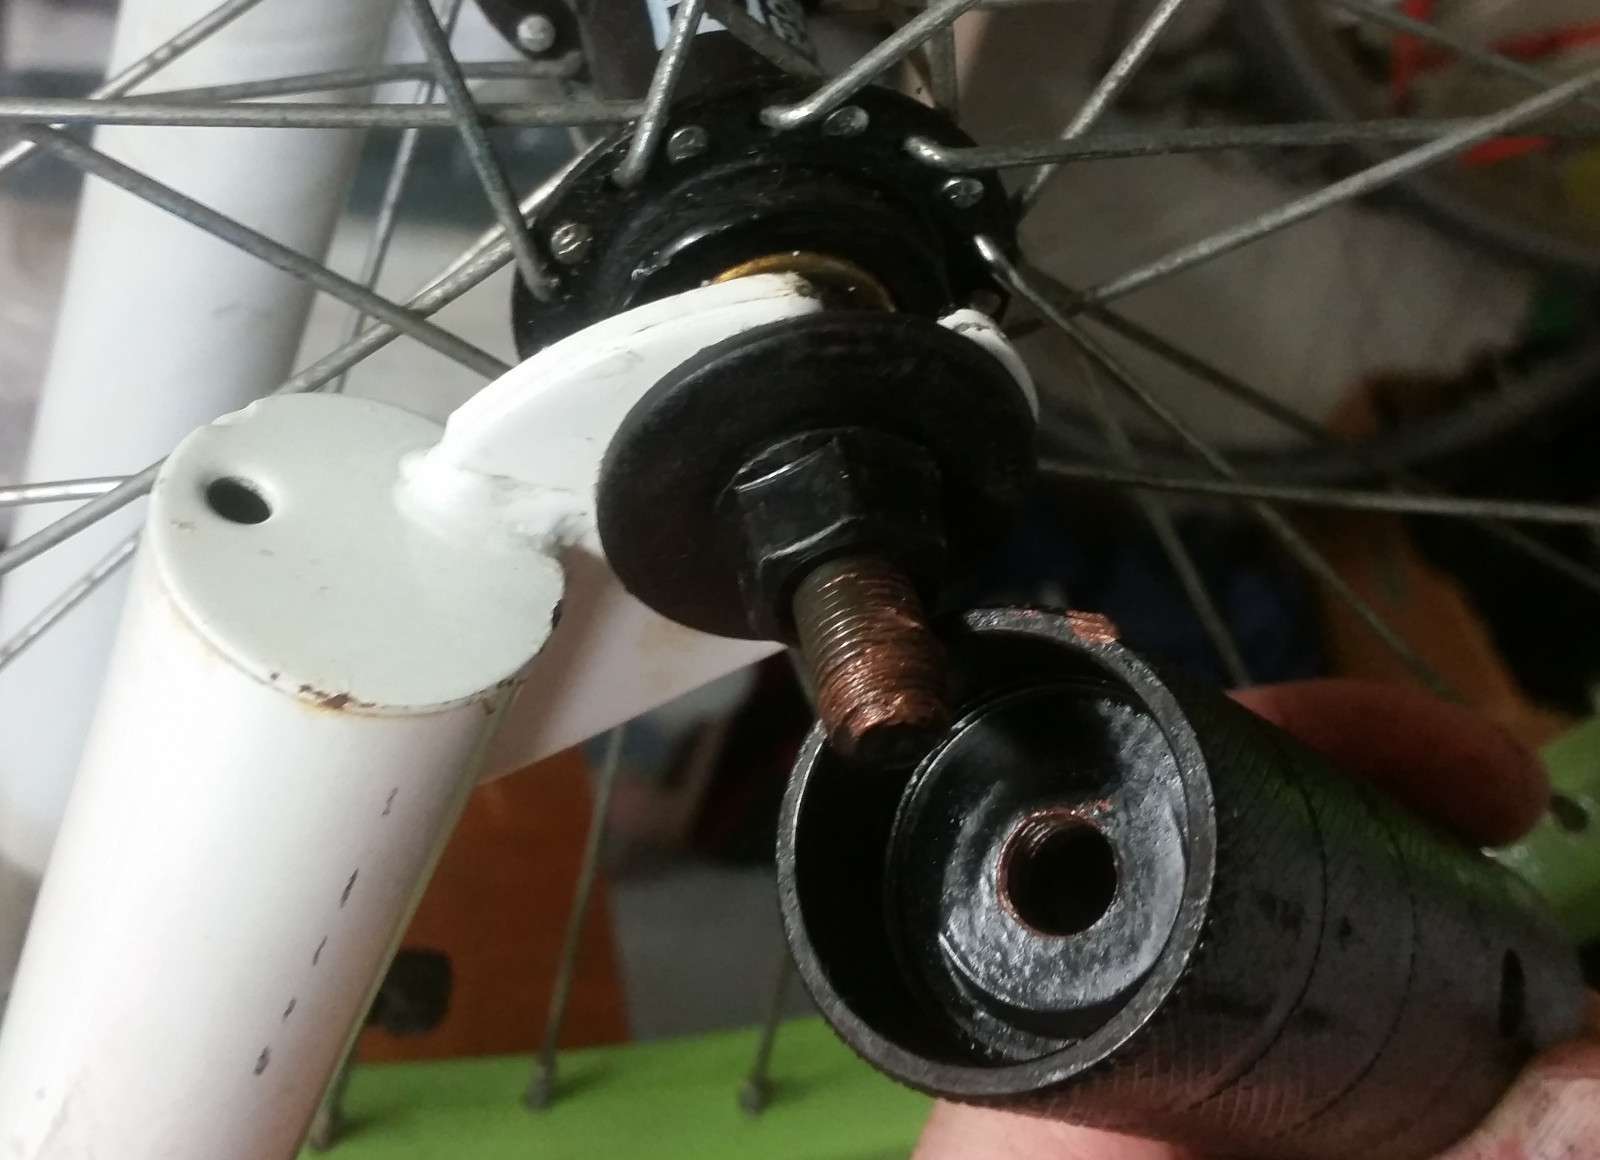
Foot Pegs or Pegs

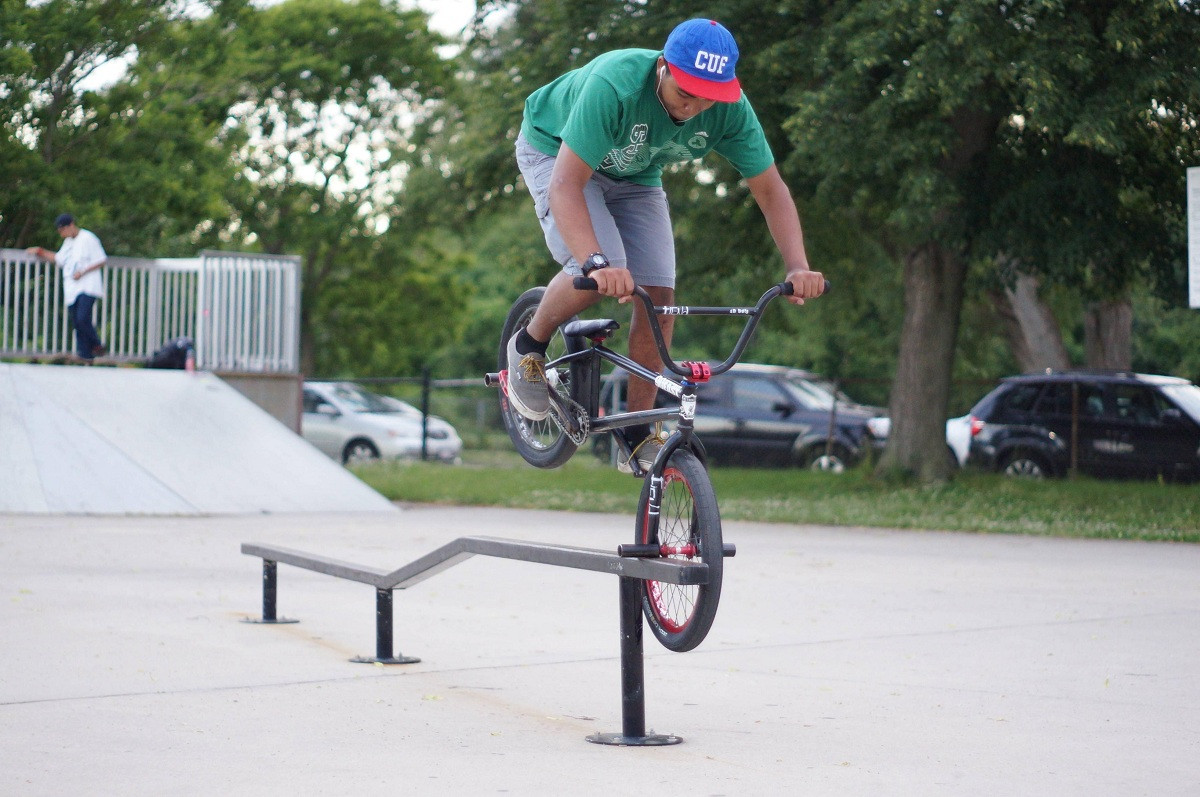
These are axle extensions that allow a trick BMX rider to stand or hold onto the bike in additional places. They can also be used for grinding/sliding tricks.

""

Solely the domain of stunt BMXs - you'd never see these on anything else.

To release the normal process is a screwdriver through two opposing holes and simply unthread.

""

Each peg is essentially an elongated nut that screws over an exposed length of the bike's axle. As such, it is possible to overload the peg and bend the end of the axle making removal difficult. A loose peg is also more likely to damage threads so make sure they're tight.

Pegs are almost always made from steel, though plastic ones may be coming. The outside is frequently knurled or textured for grip on a shoe's sole, but can also slide on a metal fixture like this:

https://uploads-ssl.webflow.com/5bf26b8bdf7c09f5752d8b38/5bf27d5760911a5089560000_bike%20peg.jpg

Not the answer you're looking for? Browse other questions tagged or ask your own question.