5

I was wondering if I'm missing something when I patch my wheel, because I patched it yesterday and it had low pressure today.

This is what I did:

  1. Released the air
  2. Used 2 screwdrivers to remove the tire from the rim
  3. Removed the tube with my hands
  4. Inflate the tube
  5. Took the tube into a bucket with water to see where the bubbles came from
  6. Identified the puncture point
  7. Let the tube dry
  8. Filled the zone around puncture with a half milimeter layer of glue
  9. Let dry
  10. Took out the transparent plastic from the patch
  11. Put the patch over the glue layer
  12. Put pressure using hands
  13. Put the tube in position on wheel (looking at where the valve should go)
  14. Put the tire in position
  15. Inflate the tube

It happened to me once before, but other times worked ok.

I would like to have a complete procedure to patch a tire.

4
  • This varies between different types of patch kits, and your specific patch kit probably came with instructions. We can't possibly give you an exhaustive "checklist" for every type of puncture/patch without making it so generic as to be useless.
    – user229044
    Commented Oct 30, 2012 at 17:13
  • Is the leak in fact form the same hole or did you accidentally pinch a new hole when you put the tube back on the rim/tire?
    – Brad
    Commented Oct 30, 2012 at 17:15
  • Instructions are in chinese :( I'll try to explain better.
    – jperelli
    Commented Oct 30, 2012 at 17:16
  • Good link to rei with very detailed instructions: rei.com/learn/expert-advice/flat-tire.html
    – Benzo
    Commented Oct 30, 2012 at 17:24

5 Answers 5

7

Somewhat generic instructions for using a patch kit:

  1. Remove the wheel from the bike, check for obvious damage to the tire

  2. Remove the tube from the tire

    You can use tire levers to remove the tire from the rim. Be sure not to add additional punctures to the tube by pinching it with the levers.

    Note the orientation of the tube within the tire so you can trace down the puncture point.

  3. Find the puncture on the tube

    May help to put some air in it and use your cheek/eye to feel for leaks.

    Once you've located the puncture, find the point in the tire where the puncture occurred and make sure there is nothing stuck in the tire (like a shard of glass) which will re-puncture the tube.

    Assuming it is a puncture and that the tire isn't actually torn/worn through, you can proceed to patch the tube. If the tire is too damaged the tube will just pop again, so there isn't much point.

  4. Apply the patch

    Typically this involves gently sanding/roughing up the surface of the tube, applying adhesive compound, letting it dry for 5-10 minutes, and then applying the patch. Most patches I've seen have a brown side, and a black/brown side. The black/brown side stays upwards, the fully brown side is applied against the tube. Wait another 5 to 10 minutes for the patch to bond to the compound.

  5. Install tube in tire

    Inflate the tube slightly to make sure it holds air. Insert it into the tire, then mount the tire on the rim, one wire bead at a time. The first bead should go on easily, the second may require tire levers or strong thumbs. Be very careful not to puncture the tube if using levers.

    I find it helps to completely deflate the tube to get the last bit of the wire over the rim. There are some good tutorials on getting the last bit of the wire onto the rim, which can be tricky to do without damaging the tube.

  6. Inflate tube, checking again for damage/bulges/splits as you approach full pressure

  7. Ride away

2
  • "find the point in the tire where the puncture occurred and make sure there is nothing stuck in the tire" That was what it happened. It had a small piece of metal, like a needle.
    – jperelli
    Commented Oct 30, 2012 at 19:08
  • Glad to hear it helped.
    – user229044
    Commented Oct 30, 2012 at 20:07
4
  1. Except in an emergency, don't use screwdrivers. Use plastic tire levers or a Quick Stick to remove ONE bead of the tire from the rim. Don't completely remove the tire.
  2. When you remove the tube, attempt to keep it "right side up" relative to the wheel laying on the ground/bench. This makes it easier for step 4.
  3. Over-inflate the tube (until it bulges up to about 50% fatter than normal) and then listen/feel for the leak. Holding your face near the tube often works well here. You will find the leak this way, without having to find a tub of water. Mark the leak somehow.
  4. Having found the leak, lay the tube (still "right side up") on top of the tire, with the stem aligned with the stem hole. Check the tire at the puncture point for either a piece of something still embedded in the tire or a tear/gash. If you lost track of which side is right-side-up, flip the tube over and check the other spot.
  5. Discard the tube if the puncture/hole is at or around the stem.
  6. Deflate the tube (if necessary).
  7. Clean the tube for an inch or two around the hole. First wipe with tissue or whatever (maybe moistened with spit), then use the sandpaper or whatever is supplied in the patch kit.
  8. Select a patch, and note how large it is. Apply a THIN layer of the rubber cement to the area around the hole, in a wide enough pattern to be larger than the patch.
  9. Let the cement dry for a few minutes, until it's lost its gloss.
  10. Apply the patch.
  11. Press the patch into place, using a tire lever or some such to rub back and forth over it.
  12. Let set another 5 minutes or so.
  13. Somewhat gingerly inflate the tube again and check for other leaks.
  14. Use chalk powder (ideal), dust from the roadside, or just a piece of tissue to cover the exposed glue so that it won't stick to the inside of the tube.
  15. Stick the tube inside the tire, work the stem into place in the rim, double-check that the tube is not twisted or kinked, and then put the bead of the tire back on the rim.
  16. Partially inflate (maybe 15 pounds) and roll the wheel on the ground back and forth for several feet, putting weight on the wheel, to help seat the bead.
  17. Fully inflate.

Of course, rather than patching a tube on the road it's far better to just install your spare and then patch the tube later, in a more controlled environment.

4

There are a few things you can do to reduce the chance of damaging the tube while patching it or after patching it.

Invest a couple of dollars in a tire lever, they're plastic and will be a lot easier on your tire and tube than a screw driver.

When you take the tube out to patch it, take a few minutes to run the tips of your fingers along the inside of your tire to find the likely cause of your puncture, a thorn or piece of metal, etc. If you don't remove the object that popped your tube in the first place from the tire, patching it isn't going to do much good, and it will eventually pop again.

0
3

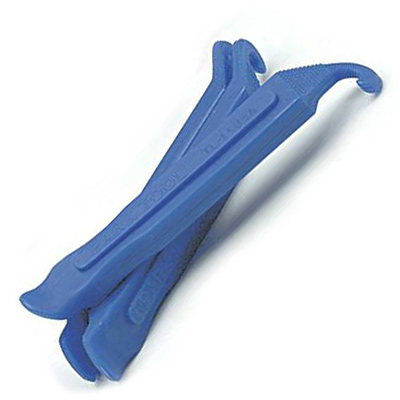
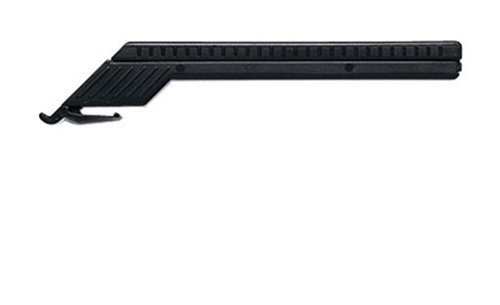
Aside from what the others have said here- you should not be using screwdrivers to remove your tire from the rim. That's a sure way to adding another puncture to your tube. You need to use one of these tire levers:

Standard Tire levers

or

Speed Tire lever

1
  • Or, best of all, a "Quick Stick". Faster than tire "irons" and less likely to damage the tube. Commented Oct 30, 2012 at 22:35
1

My typical procedure is different from the other recommendations because I often leave the wheel on the bike and the valve in the rim. It's for all-terrain ("normal") tire sizes, as opposed to racing bikes with narrow tires.

The first advice is to ride Schwalbe Marathon tires. (I'm not affiliated.) This will dramatically reduce the frequency of punctures.

  1. It is often not necessary to remove the wheel at all. If you have a quick release it will make things easier. But it is often not necessary. Simply place the bike on saddle and handle bar.
  2. If light and eyesight are good and the tire is not too dirty, inspect the tire's rolling surface for obvious thorns and splinters. Locating the puncture now makes the following steps easier. If the damage is too small to notice you'll have to locate the puncture later.
  3. Use the tools shown by Gary to lift the tire off the rim. If you know where the puncture is lift it there, obviously; if not, start opposite the valve. It can be surprisingly hard to get the tire off. Sometimes you really need all three levers: The first one gets the tire edge over the rim just in one point but is then stuck there. Keep it in and hook it into a spoke. Use a second lever to do the same with an adjacent location so that the two lifted locations join. Hook that, too. Take the third one, doing the same. If the tension is still too strong to start sliding the lever along the rim, remove the middle lever and continue the procedure along the rim until the tension is low enough to slide the last lever around.
  4. If you haven't taken the wheel off you need to release the rim brakes so that tire and eventually tube can rotate around under the brake shoe.
  5. Leave the valve in the rim. Pull the inner tube out, leaving an inch on either side of the valve in place to prevent mechanical stress on the notoriously delicate valve/tube connection.
  6. Even if you know where the puncture is, inflate the tube. If you know where it is inflate until the tube isn't floppy any longer. That makes it easier to sand the surface. Otherwise inflate it until it is maybe 150% its uninflated diameter, or even more when you get desperate: The tube rubber is very elastic. Go around the rolling surface and listen, look and feel for punctures. In a quiet environment the hissing of the escaping air is often audible. If not, and if there is no visible clue, wet your lips and move the tube along closely under the wet lips. Even small punctures are often detectable because the escaping air is cool on the wet lips.
  7. If that fails, take the valve out and inspect the entire tube: the puncture may be in the 2 uninspected inches. Make sure to not rotate the tire around the rim so that you can later locate the puncture location and search for the foreign body that caused the puncture, if it is still there. If still nothing, inspect the rim side of the tube. As a last resort get a bowl or bucket of water to see bubbles rise.
  8. If necessary, dry the puncture surroundings very carefully and sand them down very thoroughly. The sanding is essential for a good patch: It exposes pristine rubber free from dirt and fat and increases the surface area for better glue contact. The sanded surface must be, as Karl Valentin famously put it, a uniform "dark black", that is, much darker than the "regular" black of the rest of the tube. Its area must be larger than the patch so that the patch's edges will stick well; they are most prone to peel off. Apply glue, to an area larger than the patch. If you want, the wait time can be a bit shorter than indicated; if the solvent hasn't entirely evaporated the patch will stick better because it half dissolves but will become temporarily softer. Probably not recommended for high pressure tires.
  9. Because ideally you never took the tube out you can locate the puncture on the tire. Inspect for foreign bodies like shards or thorns also from the inside of the tire. Remove them by pinching and rolling the tire between two fingers, outside out, to "walk the shard out". If needed, use a needle or similar, but don't enlarge the puncture. If it is large already consider applying a second patch on top to protect the tube location better until you are home.
  10. Reassemble, inflate. Inspect the puncture site to make sure the tube isn't visible or even bulges out. If the puncture is that large and you must ride now, inflate less and get a new tire later.
3
  • Poor bike! Do not stand it on the handlebar and the saddle. Not on any hard surface or gravel anyway. The time you save by not removing the wheel could be even shortened by just removing it after all, putting in a spare tube and patching at home. Commented Nov 4, 2021 at 8:24
  • @VladimirF This is what I do at home, too. But yes, with a quick release it's probably overall better to take it out and work at a better place or in an easier position. Commented Nov 4, 2021 at 9:29
  • There is no problem flipping the bike over, just be careful of any bike computers etc. Much easier to remove a wheel that way, and less likely to damage the gears and dropouts. Just another "Rule" that has been taken seriously...
    – awjlogan
    Commented Nov 4, 2021 at 19:16

Your Answer

By clicking “Post Your Answer”, you agree to our terms of service and acknowledge you have read our privacy policy.

Not the answer you're looking for? Browse other questions tagged or ask your own question.