4

I got a flat yesterday morning after a normal ride, walked my bike inside the house and propped it upside-down (like this) overnight. This morning, I changed the flat and put on some brand new tires I bought last week.

When I take it out for a ride, I find that the freewheel is nearly locked up! I can forcibly move it by dragging on the pedals and bunching-up the chain, but it's not easy. I've tried adjusting the tension on my quick-release, but that doesn't seem to make a difference.

The freewheel on my SRAM S27 has always been tight (to the point of putting some slack in the chain when back-pedaling), but now I can't even coast! How did this happen, and what should I do about it?

Edit - the next day:

I made my adjustments on Tuesday morning as I said in the comments, but after only a 15 mile ride the freehub was completely tightened back up again!

After looking into it a bit more carefully, I found a service manual for my wheels with some nice pictures. Here's what I adjusted on Tuesday morning:
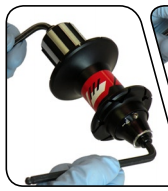
Rear hub adjustment

I apparently loosened the "end cap" from the threading on the axle. Here's another pic of the whole assembly:
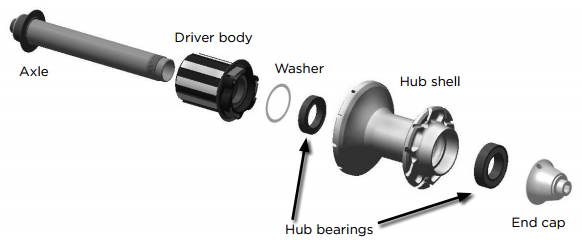
S27 rear hub assembly

Unfortunately because it tightened right back up that obviously wasn't a very robust solution.

7
  • 5
    I suspect that somehow, while changing the tire, you "adjusted" the cone nuts of the rear wheel. If the fix is not "intuitively obvious" to you (ie, if you don't have a mechanical bent) then you should take it (the wheel) to a bike shop for adjustment. Commented Jun 26, 2012 at 18:30
  • 1
    (The other slight possibility is that something -- gravel, eg -- has gotten stuck between the freewheel and the hub proper.) Commented Jun 26, 2012 at 18:31
  • Just to make sure... The new tires aren't rubbing, are they?
    – Jack M.
    Commented Jun 26, 2012 at 21:52
  • @DanielRHicks: I believe it was the cone nuts, but are they typically adjusted with Allen wrenches (one on either side of the hub)? Whatever I adjusted was insanely tight.. Anyway, please throw an answer up if you think you've got it - I would also love a guess as to how I might prevent it in the future if you have any ideas!
    – ladenedge
    Commented Jun 27, 2012 at 4:11
  • 2
    I can't think of anything on a hub you'd adjust with Allen wrenches. Commented Jun 27, 2012 at 11:07

2 Answers 2

4

I decided to put up another answer because while Daniel's hunch and Billy's excellent answer get at the gist of the solution, I did find some specifics that might help someone else (though perhaps only a SRAM S27 owner).

First of all, the service manual is pretty helpful.

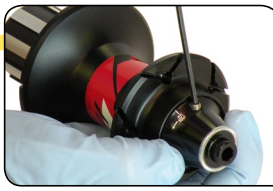
In my case, the "end cap" was tighening on its own during rides. Normally, this little set screw is supposed to keep the end cap from threading or un-threading (ie. you get the adjustment just right, apply the set screw, and it should all just stay put).

Adjustment set screw

The set screw actually applies pressure to a rubber o-ring, which in turn presses against the threads on the axle to keep the end cap from turning.

On my wheel, that o-ring had actually partially disintegrated where the set screw contacted it. So instead of pressing a healthy o-ring against the threads, it just sort of mashed some rubber particulate in there.

The right solution to this problem is probably to get a new o-ring. The route I took, however, was to rotate the o-ring about 90° so the set screw was once again above a healthy bit of rubber. I then re-adjusted the end cap tension and re-applied the set screw.

Hopefully that keeps me going for a while without tightening up again. Thanks for all the help, everyone!

1
  • that is NOT a loose bearing axle, so my answer didn't really do much, but if it helped even enough to lead you in the right direction then I am glad it helped!! ;-)
    – BillyNair
    Commented Jun 29, 2012 at 2:58
3

Unless you have sealed bearings, my money will be on the cone nuts. The most common way to adjust them is with a flat wrench. The rear wheel is the most complicated, but it isn't that bad. Remove the wheel from the forks and loosen all the nuts on the left side, the side that doesn't have the gears. You only need to loosen them enough to expose the cone fully past the sprockets. Make sure to watch for the bearings falling out. The best way to do this is to place the axle on something hard to push the right cone up against the bearings as you loosen the left side, then flip the wheel over and push the left cone up. (Grease can act as glue to keep them all in there.) Tighten the locking nut against the right cone to the recommended torque. Now tighten the left cone down on the bearings. We are not going to get it perfect yet, just close enough to put the wheel back on the frame and tighten the right wheel nut. (If you have a quick release, take it off and use a wheel nut. If you can not find one anywhere, keep the wheel off the bike and use a 3rd wrench on the right side to keep the axle from rotating in this next procedure.)

We are now going to adjust the left side. This is where you need judgment. You need to have the cone snug against the bearings but you also need to allow the wheel to spin freely. Spin the wheel and try to find that perfect sweet-spot for the cone. Once you find that perfect spot, keep the flat wrench exactly where it is and tighten the lock nut up against it. (This is where the wheel being on the bike comes in VERY handy. If the axle rotates, you will lose that sweet spot and your cone will either be too lose and cause damage to the axle or too lose and cause damage to the bearings and cup. Like I said, you can opt to use a 3rd wrench on the right side.) Now just tighten the left wheel nut and you are done!

The front is almost the same except it doesn't matter which side you tighten down first.

(NOTE: You MUST have washers between the cones and lock-nuts or they will mesh together and act as one unit and loosen up very quick!!)

2
  • Can you confirm the need for washers - I have never seen washers between the cone and the lock nut on the dozens of shop-purchased bikes I have owned, or in any workshop manuals. From Parktools "The locknut is tightened against the cone to prevent the cone from moving" parktool.com/blog/repair-help/hub-overhaul-and-adjustment
    – mattnz
    Commented Jun 28, 2012 at 1:05
  • in that link you shared the second diagram shows "spacers", and you can see a spacer in the first photo even though it is not labeled. I used to work in bike a bike shop and all the loose bearing wheels I worked on had spacers/washers. You need something there to separate the 2 sets of threads or they will meld into one "threadset" and act as one nut. I have personally seen this happen a number of times.
    – BillyNair
    Commented Jun 28, 2012 at 2:39

Your Answer

By clicking “Post Your Answer”, you agree to our terms of service and acknowledge you have read our privacy policy.

Not the answer you're looking for? Browse other questions tagged or ask your own question.