4

On my first multi-day bike tour the only physical trouble I had after a several long days on my bike was pain in the wrists.

My current touring bike setup has drop bars with a long fork. I chose the setup so that I would have a couple different positions to ride in, though in practice I generally keep my hands in palm rests on the brake levers.

I'm sure preference can be up to individual preference/physiology, but I was wondering if there were preferred handlebar types/brands/positions/setups known to be good for addressing wrist pain.

Alternately, is there an ideal wrist position (or other strategies) I should look for, regardless of gear?

Thanks!

2
  • 1
    You have what is generally the best setup -- drop bars with several hand positions. You can try rotating the bar slightly to make it more comfortable to use the drops. You can also consider getting a "randonneur" bar which has a less severe drop distance and a few extra twists here and there. Commented Jan 24, 2013 at 23:49
  • 1
    You need to unweight your hands a bit - put more push into the pedals, raise the bars, and periodically move, or bike with a more upright position. On a climb, use your tops more
    – Criggie
    Commented Dec 3, 2015 at 20:19

4 Answers 4

5

The biggest consideration for addressing wrist and hand pain (especially when riding long distances) is by reducing the pressure you're bearing on your wrists. Aggressive riding postures put excess pressure on your arms/hands/wrists/elbows for the benefit of aerodynamics and better advantage on your pedal strokes. For the majority of cyclists unconcerned with such things (tourists, especially) comfort and rideability are more worth the effort.

The traditional KOPS (knee over pedal spindle) has been the go to rule for adjusting saddle fore-and-aft for quite a while. Lots of people find it totally satisfactory, however, everyone is built differently and quite often different riding styles necessitate different setups. Moving one's weight back onto their sit bones and feet (two parts of the body that aren't as sensitive to bearing weight) will in turn reduce pressure on your wrists. Your saddle needs to be adjusted for the appropriate height and then set back a bit.
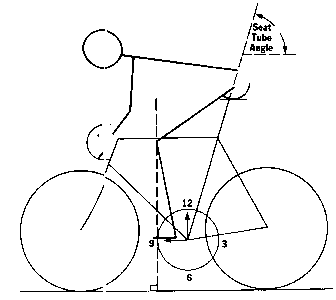
KOPS

The idea is that when you squat (sans bicycle), your hips have to move back to balance your upper body. In the above diagram, you can imagine the effect of moving your saddle back as being a similar shift in weight.

To compensate for that more upright posture, you may need to change your stem and spacer orientation and setup. The idea is to bring the bars up and back (with some room for fine tuning.) Most touring bicycles are fitted with tall stems that enable you to achieve this posture. If you're refitting a bike, you may need to buy a new stem or some spacers.

Many people will suggest adding padded bar tape or thick gloves. While this is a great way to relieve some of the roughness and pressure, no amount of padding will make supporting your upper body all day comfortable. The idea is to use your legs and rump to get you from place to place.

Also, these sorts of issues can certainly be caused by medical complications (carpal tunnel syndrome, especially), so consult with a doctor if things start to deteriorate or worsen.

Further resources can be found at SheldonBrown.com and RivBike.com (and many others.)

4

Consider splurging for a fit session with a qualified bike fitter. Having your position correct isn't always just a matter of having certain handlebars. I have a custom road bike, and recently did a fit session for another bike. It can be pricey, but if you plan on riding long distances, for many years, it might be worth it! Try asking around with your bikey friends for recommendations on fitters.

1
3

You might try adding clip on aero bars. Not so much to make you faster, but to allow the option of using your bones to hold you up. Aim for creating a 90 degree angle in your arm at the elbow joint to have the pads of the aero bar support your upper body via the Humerus bone (connecting elbow to shoulder). This will allow you to rest your wrists and use your skeleton for support.

You must be very alert when riding in this position because your hands are no where near the brakes or shifters, but for long open straight stretches you can give other parts of your body a bit of recovery. Also, this aero position will feel odd/squirly at first but many can ride all day in this position, it just takes a little to get used to. You can angle the aero bars a bit more upright for comfort, experiment a bit to find the right position for you.

1

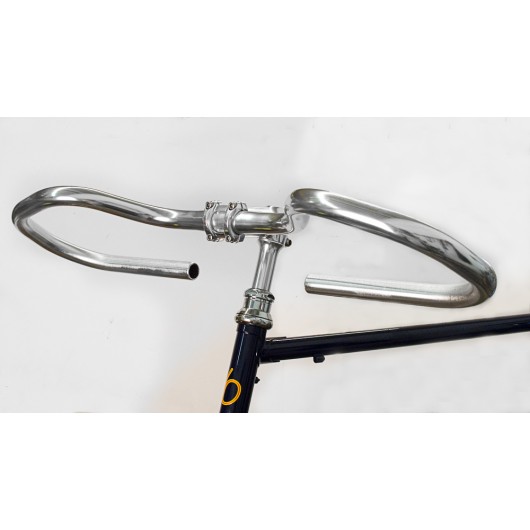
Touring/trekking/butterfly bars! (Also called "randonneuring" bars, as in a comment above.) All the hand positions ever; set the bar at whatever angle makes you happiest. Here's the set (from Velo Orange) that I'm getting on my new bike:

Trekking bars

2
  • It should be noted that the above picture is not the "classical" randonneur bar design. Commented Jan 25, 2013 at 1:32
  • Though most proper Randonneuring bars I have seen are traditionally shaped with flared out drops (notably the Nitto B132 or B135.)
    – WTHarper
    Commented Jan 25, 2013 at 1:34

Your Answer

By clicking “Post Your Answer”, you agree to our terms of service and acknowledge you have read our privacy policy.

Not the answer you're looking for? Browse other questions tagged or ask your own question.