This may not be a proper answer because I'm not a road cyclist and I'm not well versed in drop bar maintenance, however, I'm a tinkerer and have fiddled a lot with brake and handlebar setups.
After re-reading the comments, I see you mention your wraps never last "more than about three months", So I guess you are trying to wrap your bars with something else and you expect this material to last more than a year? two years or more?
Many of my road bike friends do replace the handlebar tape periodically anyway, mostly for aesthetics, just to change color and renew the look and feel of the bike when the tape wears out. Some do this once a year, some every two or three.
So here are a few suggestions:
A housing for the housing
Find some plastic flexible tubing that has an inner diameter that allows the regular brake and shifter housing to be slid inside. The thinner the wall of this tubbing, the better (I'm thinking of a ptfe tube that is used to connect water inlets of refrigerators. Its semi-transparent and somewhat flexible so it can bend around a small radius.). Wrap the handlebar as usual, but the housing should be surrounded by this tubing. So, if you need to replace the housing, you can slide them in and out without unwrapping the bar tape. You may need to leave a hole in the wrap, near the hood to allow you to handle the first 2-3 centimeters of housing into the lever body.
I guess that the tubing will bulge behind bar tape a bit more than the housing alone, but you'd keep the "aero" aspect of it.
Leave one foot outside the blanket
Another thing I'd try is to place a very short segment of housing near the lever, just 2-4 centimetres just to route the housing outside the tape, that is, do not wrap it or do as little turns over it as possible. Then the rest of the housing would be connected to this using an inline regulator or some other suitable connector. This short piece should not need to be replaced so often, as it is almost straight, and being so short, it would have negligible effect on performance even if used way beyond it's replacement period.
Brake noodles
For a particular type of setup I actually rode for several kilometers with, I had MTB levers and shifters installed on the forwards portion of "bullhorn" handlebars. The cables would exit towards the front, requiring way too much "floating" housing and to make the route back towards the bike, so I used V-Brake "noodles" to make a sharp turn towards the center line of the bike, so the housings where shorter and could be managed better.
You could do a similar thing, using a noodle just for exiting the lever, allowing for a sharp turn that routes the housing inwards and outside the tape. The noodle already has a receiver piece for the housing, so no need to reinvent that small part.
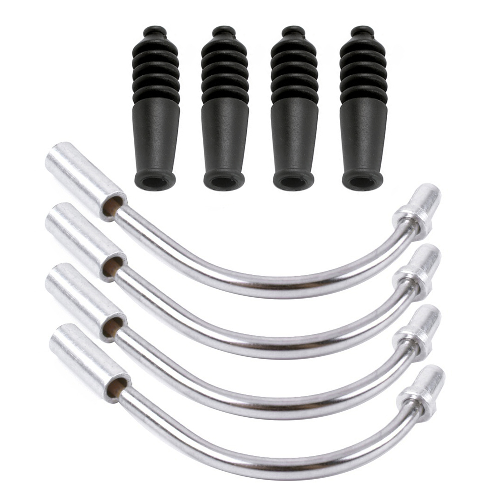
Here is what a brake noodle looks like (ignore the rubber bit, you'd just need the metallic parts and a plastic liner that comes inside):

You can get these noddles in different "degrees", meaning how much of a turn do they make. The most common is the 90 degree, that is the the cable "exits" in a direction 90 degrees relative to the direction the housing enters. There are noodles with less degrees and I have been able to buy 135 degree noodles.
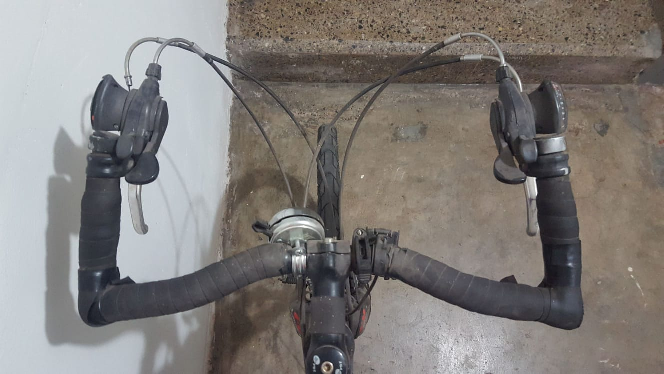
And here is my faux bullhorn setup:

The picture taken in the second bike that I fit with this setup, and I was just about to return it to MTB configuration. The first time It was done on a commuter bike that I used for delivery service (Used it daily on an urban environment). This second time, I used for a long multi day ride on road (I could keep up with proper road bikers for some kilometers with this bike!)
The point of showing you this is to "prove" the setup was very reliable, once the cables where assembled and adjusted they worked just as expected. The adjustment took no longer than it usually does. I had to fiddle more with the tape as it was not a real bullhorn bar, that's why you see some electrical tape and bad wraps around the corners.


